iot lab Workshop
iot lab work shop
This project is maintained by DanielYEHsieh
Lab3 - User Credential approach 1 Lab
In this lab, we will create a demo to provision personal user credential and Wi-Fi credential to device by android app once the device is powered at first time.
Solution Architecture
The solution architect would be separated into two part: (1) Get User Credential by Android app. (2) Android app provision the user credential to device.
(1) Get User Credential by Android app:
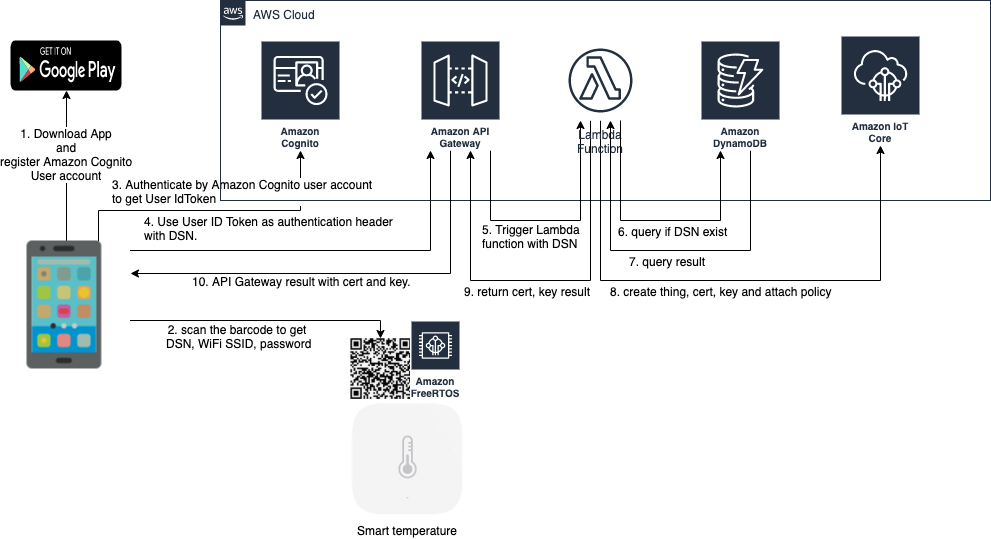 (2) Android app provision the user credential to device.
Prerequisite
- This demo take Ameba Z2 as a reference board, which have to build code by IAR.
- An android Phone with Android 6 at least to support the AWS android SDK.
- Download Android Studio and Android app code from:
- Download Amazon FreeRTOS code which support approach 1 from:
Step 1. - Use AWS Cloudformation to deploy your AWS Service configuration related to this demo.
Here’s the tutorial for setting up AWS Service including AWS Cognito, AWS API Gateway, Lambda, Dynamo DB.
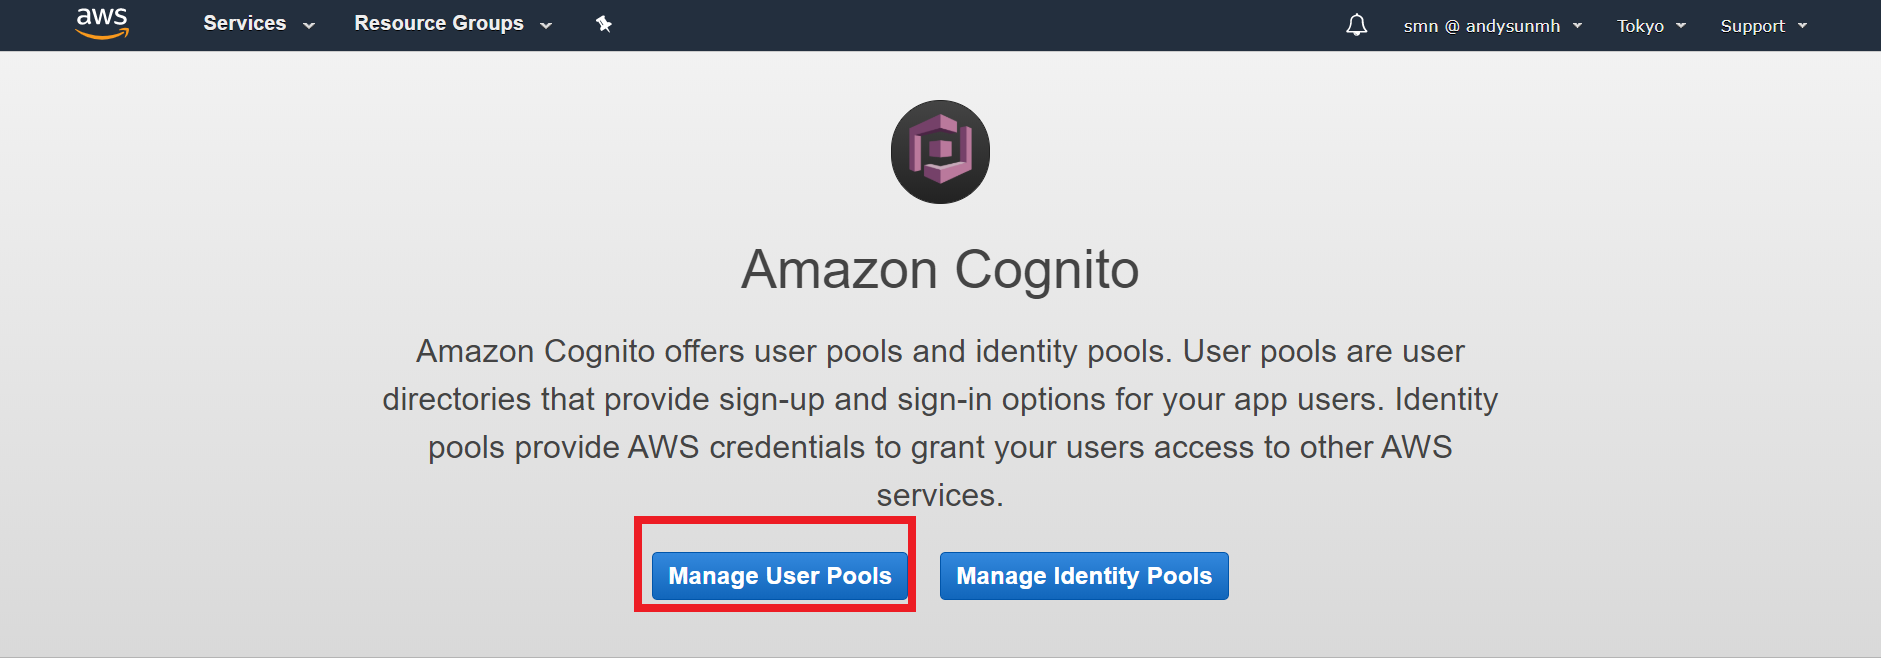
- Setup AWS Cognito
- Choose “Mange User Pools”.
- Choose “Create a user pool”
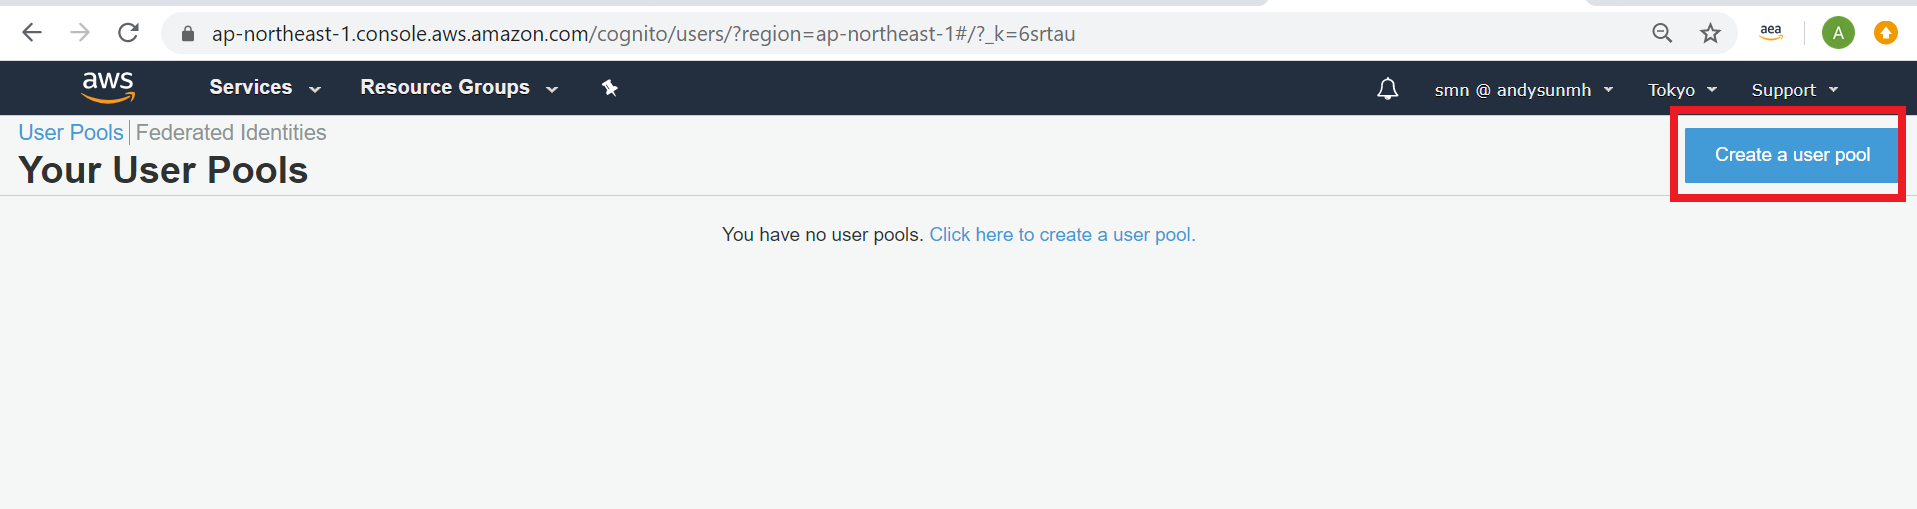
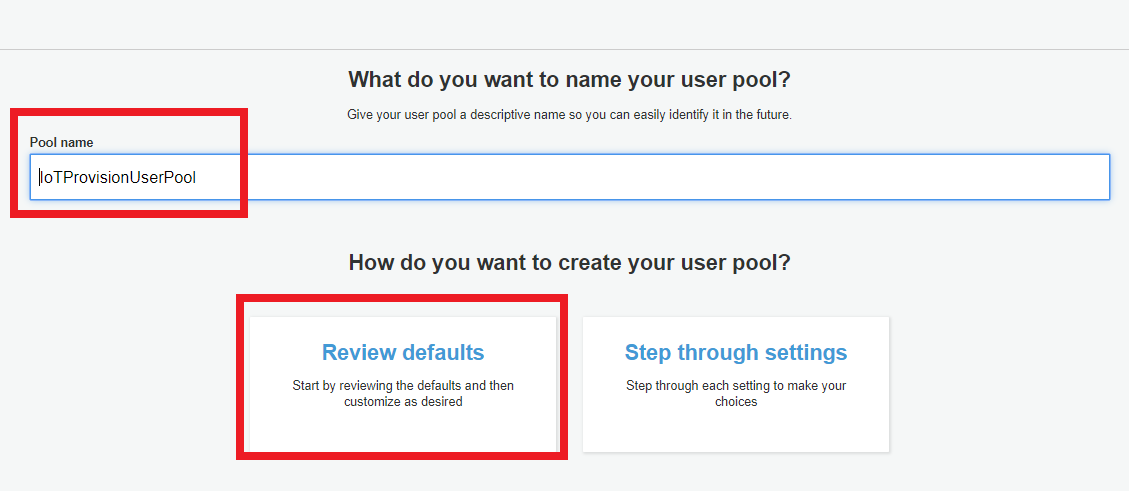
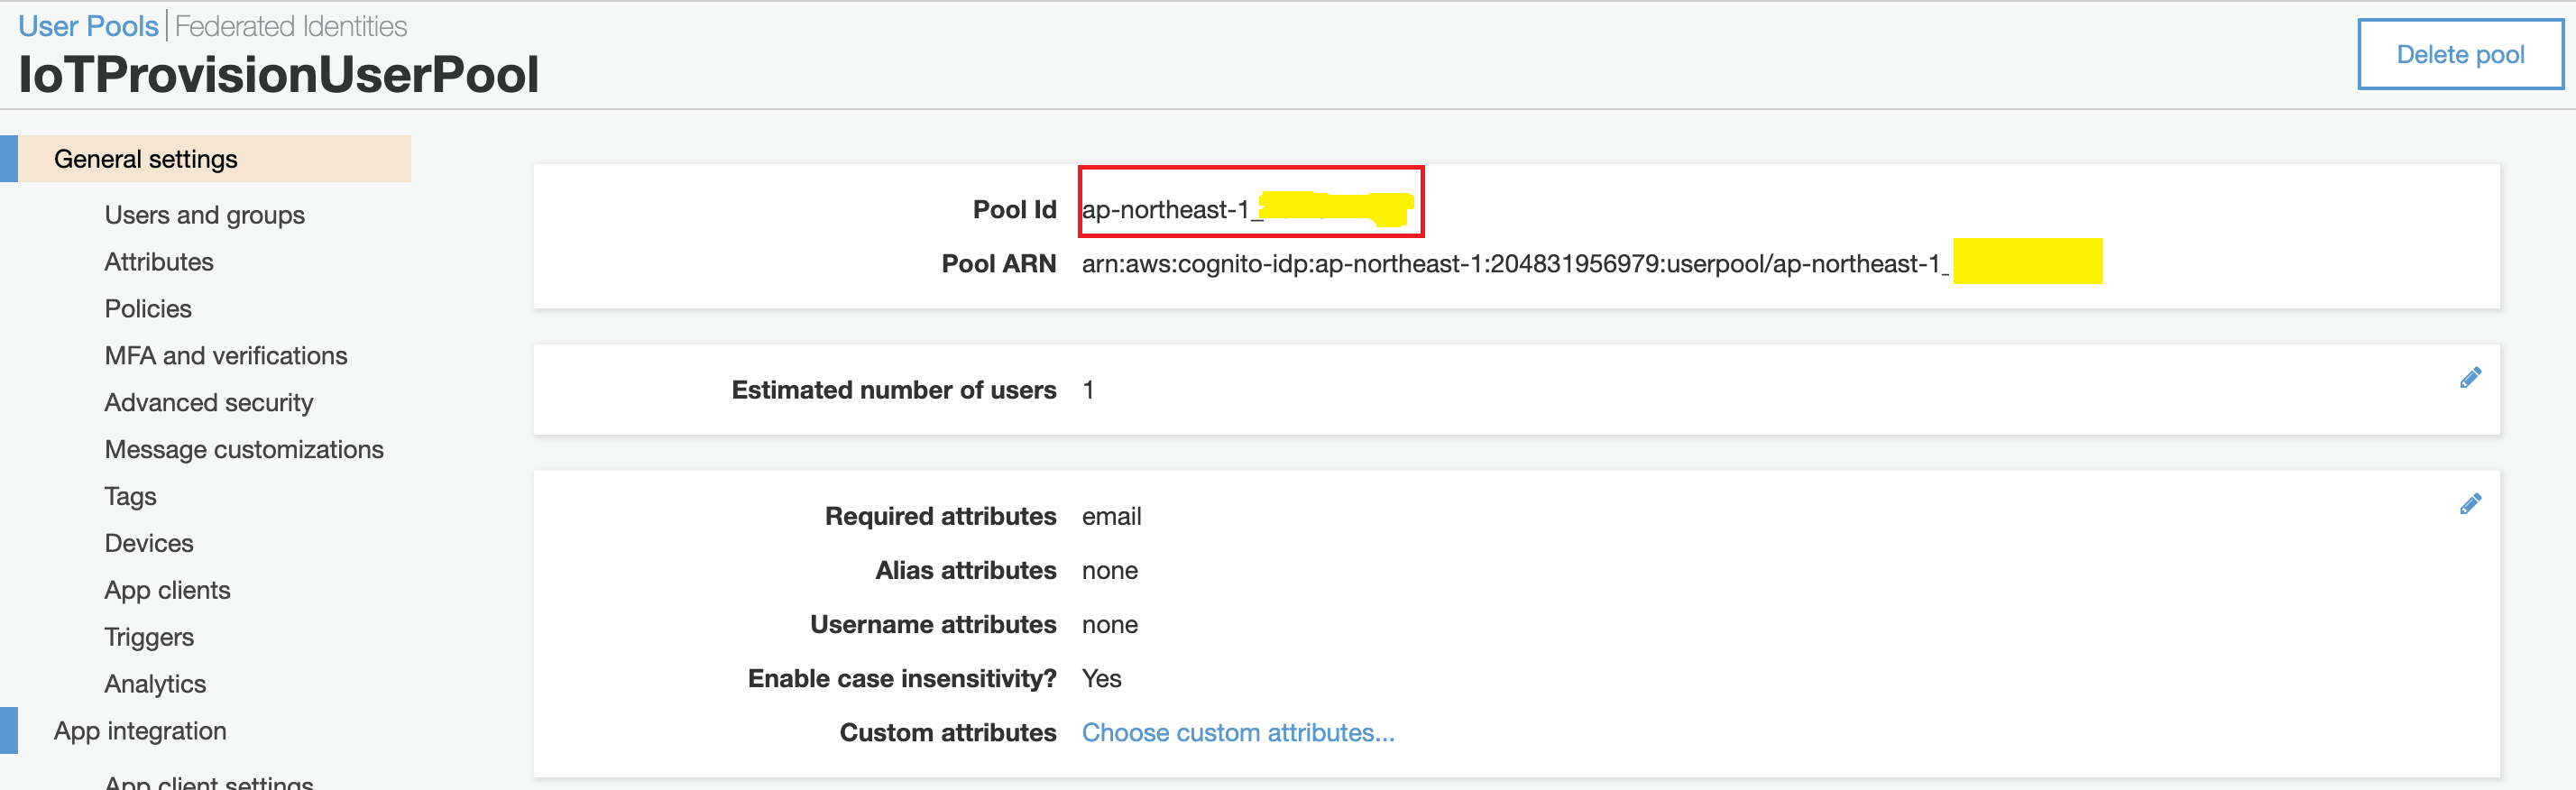
- Fill in Pool name“IoTProvisionUserPool”, and then choose “Review Defaults“.
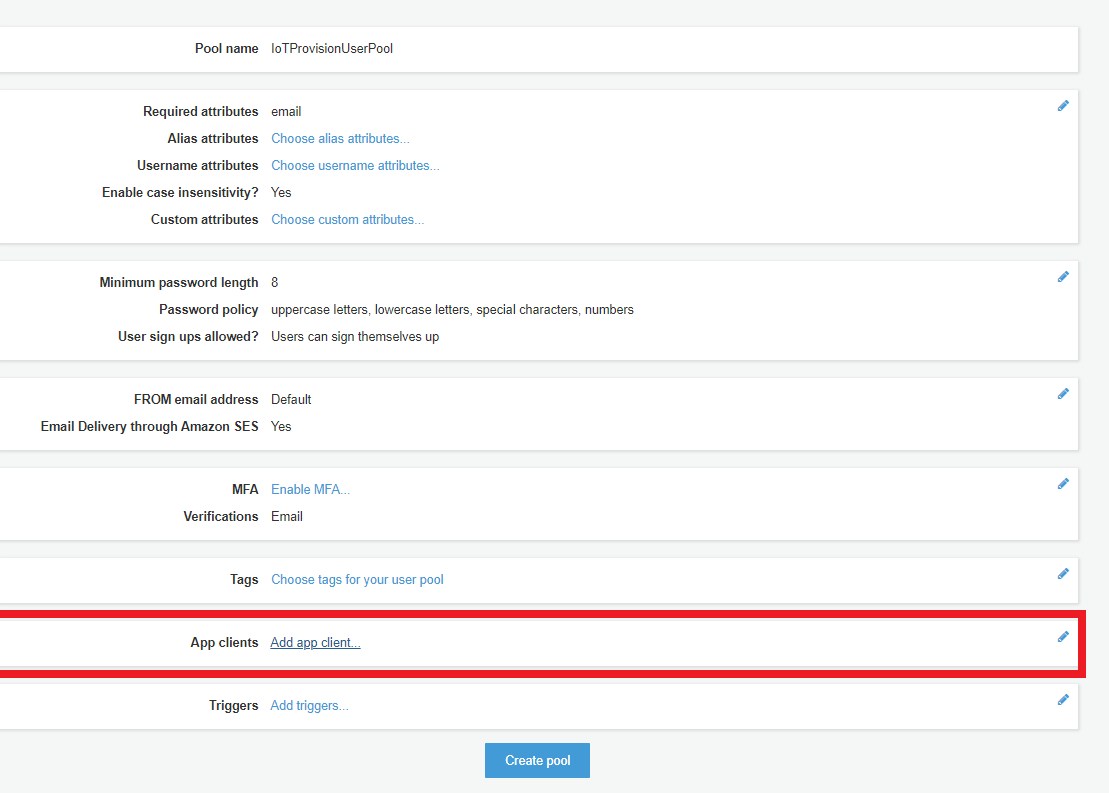
- Setup app client
- Edit App client name “IoTProvisionApp”.
- check “Enable username password auth for admin APIs for authentication (ALLOW_ADMIN_USER_PASSWORD_AUTH)“.
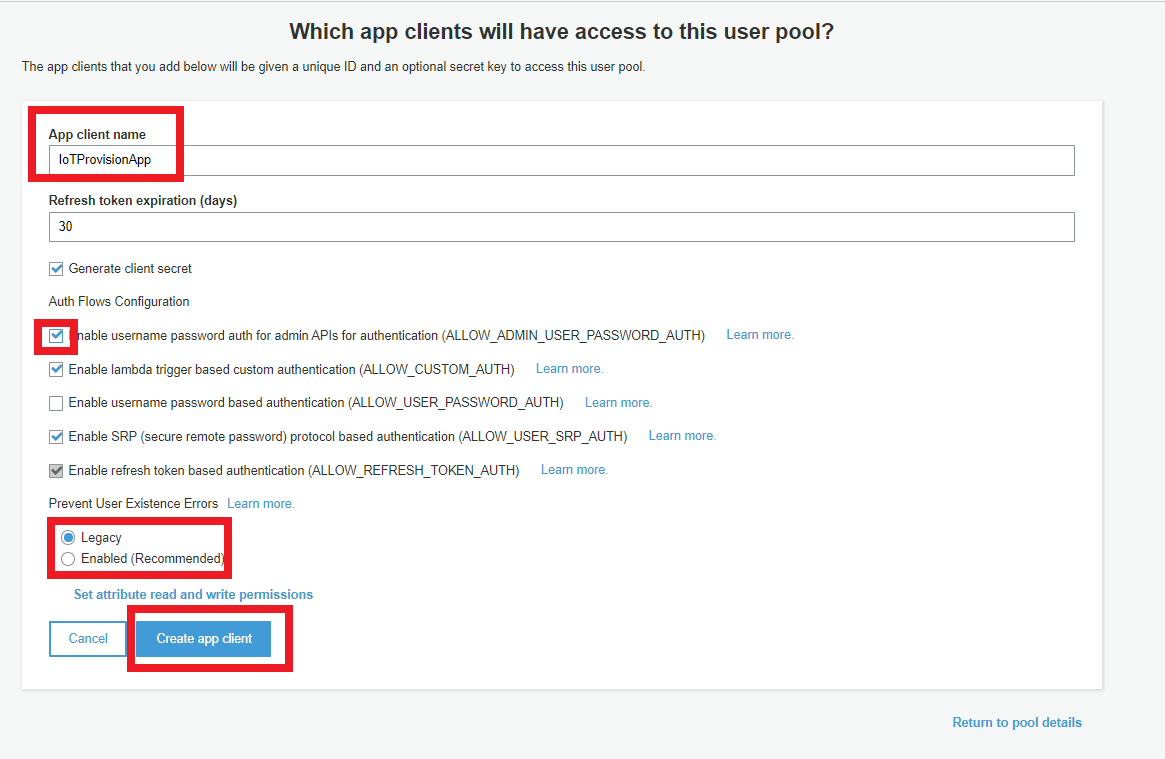
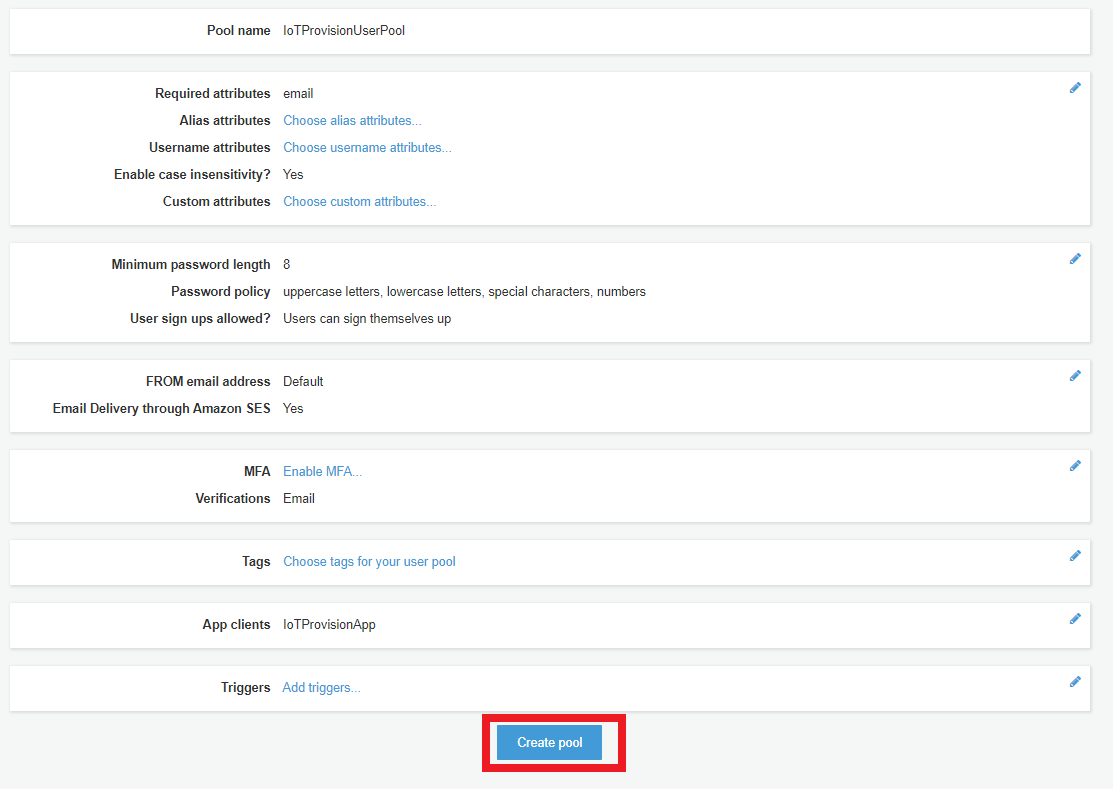
- choose Create pool
- Choose “Mange User Pools”.
- Setup Lambda
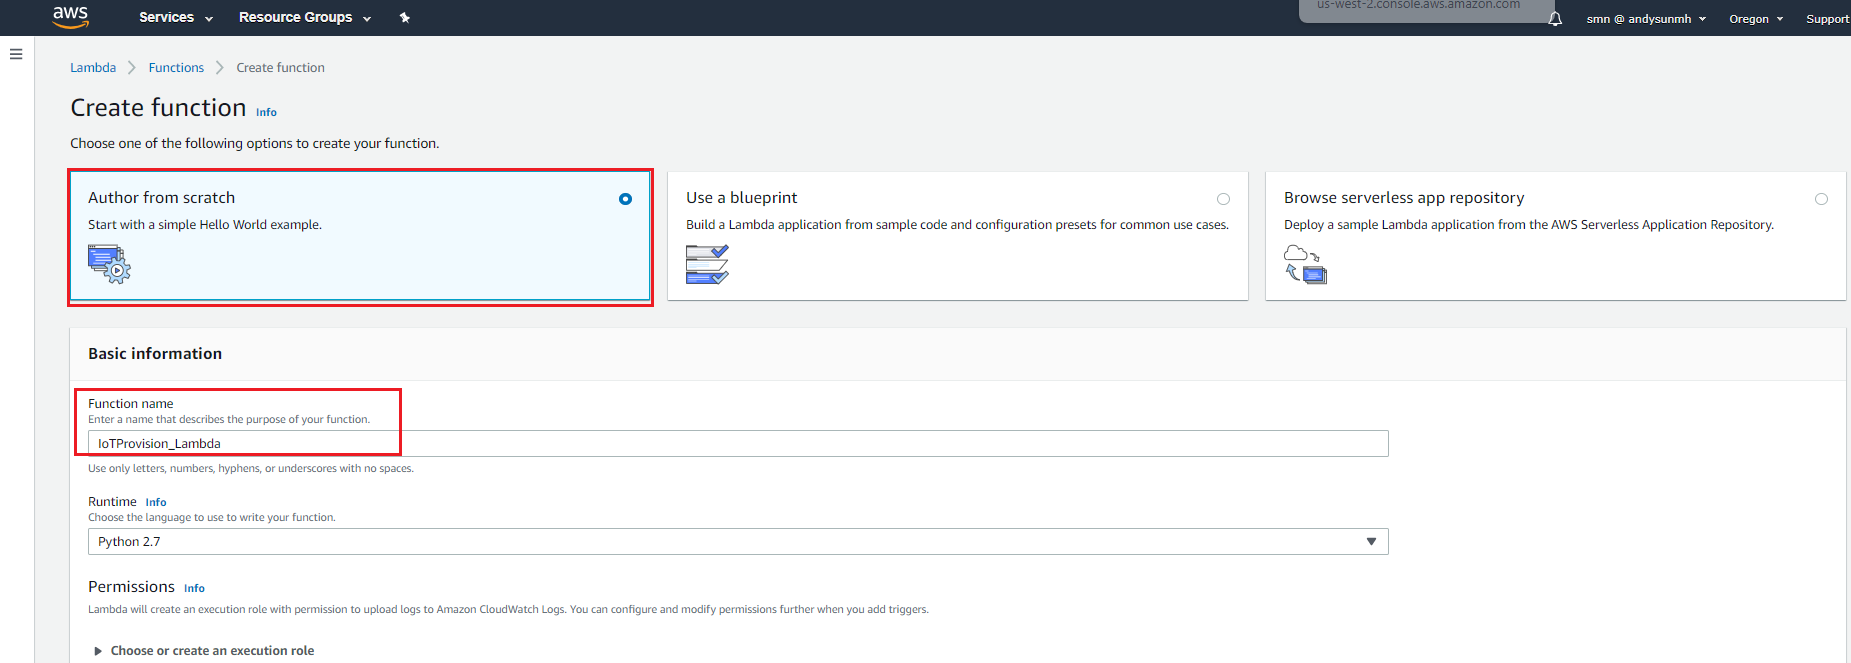
- Create Function, Function name: “IoTProvision_Lambda”
-
copy the following code to replace the code, lambda_function.py
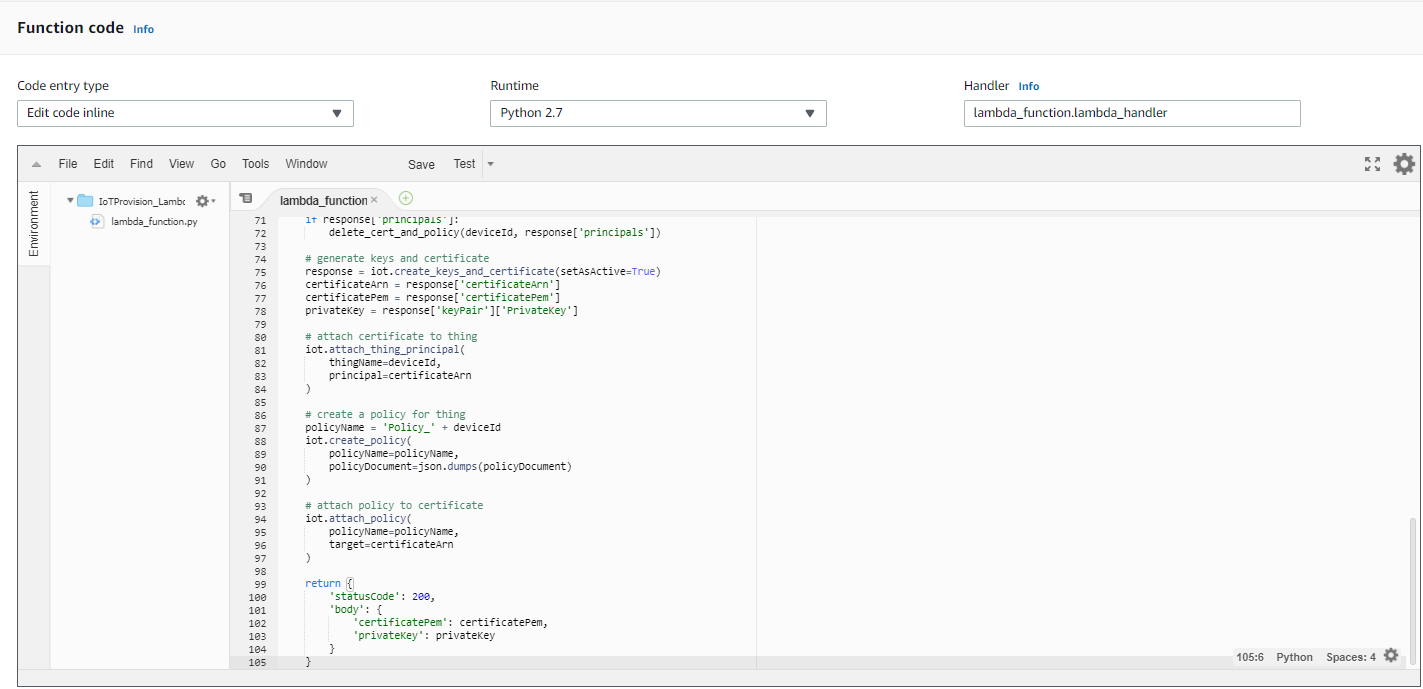
import boto3 import json import logging logger = logging.getLogger() logger.setLevel(logging.INFO) iot = boto3.client('iot') dynamodb = boto3.client('dynamodb') table = 'DSN' # Create a policy policyDocument = { "Version": "2012-10-17", "Statement": [ { "Effect": "Allow", "Action": "iot:*", "Resource": "*" } ] } def delete_cert_and_policy(deviceId, principals): for principal in principals: certificateId = principal.split('/')[-1] policies = iot.list_attached_policies(target=principal) for policy in policies['policies']: iot.detach_policy( policyName=policy['policyName'], target=principal ) iot.delete_policy(policyName=policy['policyName']) iot.update_certificate( certificateId=certificateId, newStatus='INACTIVE' ) # iot.detach_thing_principal( # thingName=deviceId, # principal=principal # ) # wait_for_detach_finish(deviceID, principal) # iot.delete_certificate( # certificateId=certificateId, forceDelete=True # ) def lambda_handler(event, context): logger.info("request: " + json.dumps(event)); # check device serial number is valid deviceId = event['params']['querystring']['SN'] deviceItem = dynamodb.get_item(TableName=table, Key={'sn': {'S': deviceId}}) if not deviceItem.get('Item'): return { 'statusCode': 403, 'body': {'msg': 'Invalid device serial number'} } # create thing try: iot.describe_thing( thingName=deviceId ) except iot.exceptions.ResourceNotFoundException: response = iot.create_thing( thingName=deviceId ) # delete certificates which are attached to this thing response = iot.list_thing_principals( thingName=deviceId ) if response['principals']: delete_cert_and_policy(deviceId, response['principals']) # generate keys and certificate response = iot.create_keys_and_certificate(setAsActive=True) certificateArn = response['certificateArn'] certificatePem = response['certificatePem'] privateKey = response['keyPair']['PrivateKey'] # attach certificate to thing iot.attach_thing_principal( thingName=deviceId, principal=certificateArn ) # create a policy for thing policyName = 'Policy_' + deviceId iot.create_policy( policyName=policyName, policyDocument=json.dumps(policyDocument) ) # attach policy to certificate iot.attach_policy( policyName=policyName, target=certificateArn ) return { 'statusCode': 200, 'body': { 'certificatePem': certificatePem, 'privateKey': privateKey } } - Go to Execution role to modify policy.
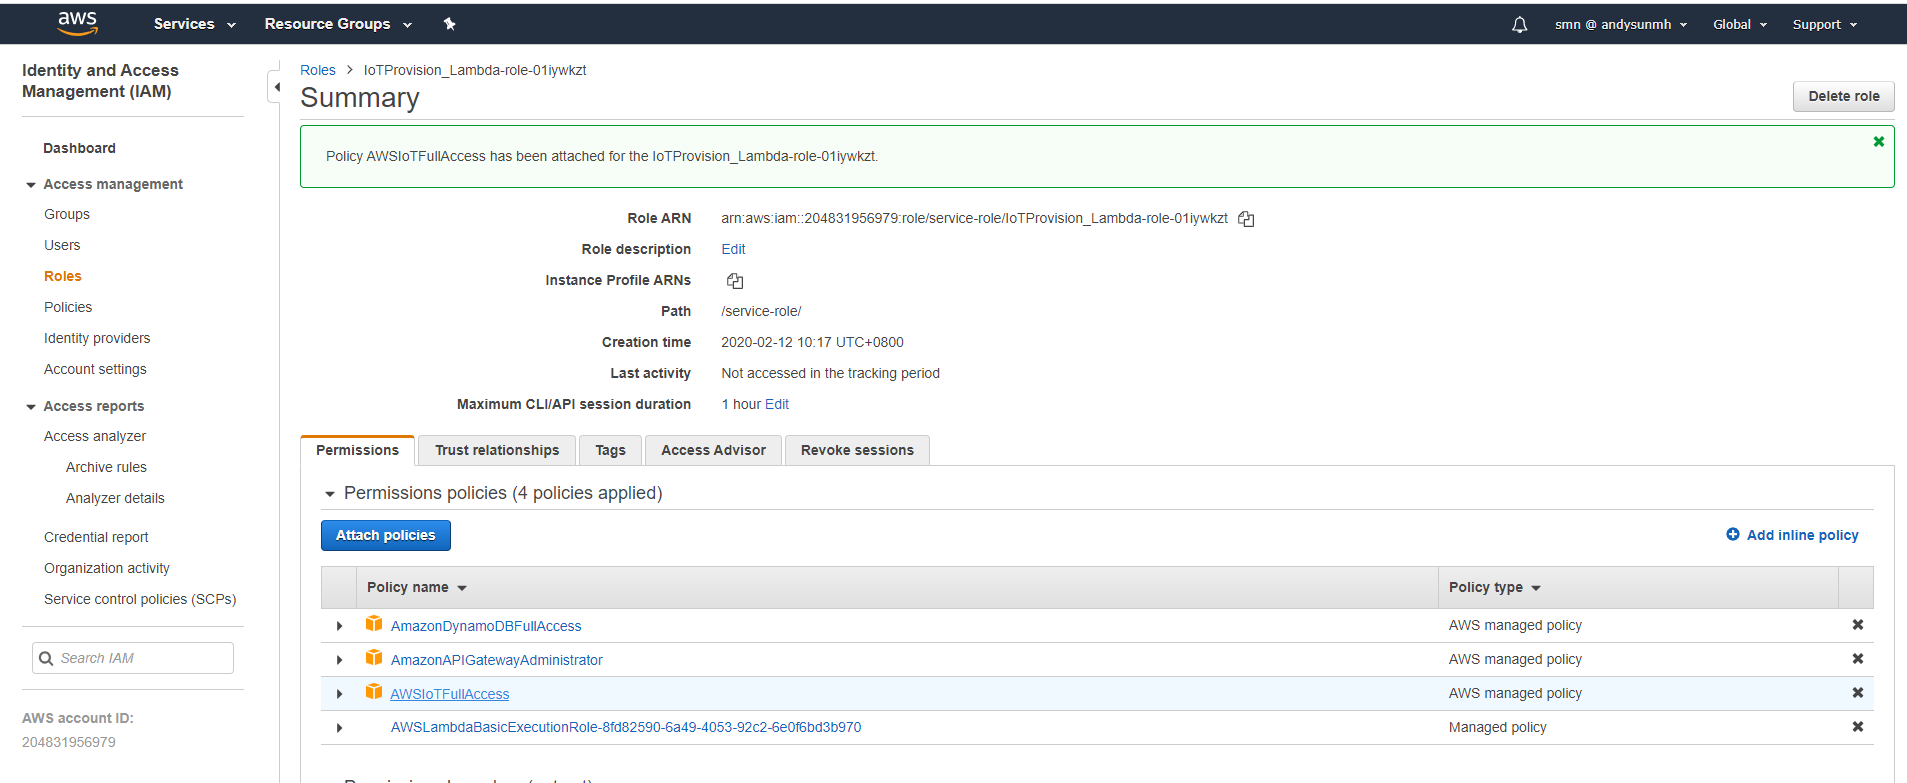
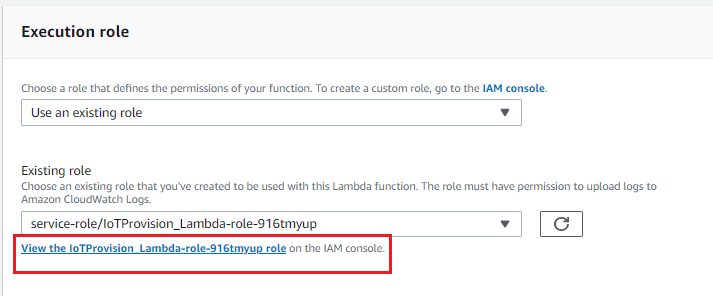 Add policy: AmazonDynamoDBFullAccess, AmazonAPIGatewayAdministrator, AWSIoTFullAccess
- Create Function, Function name: “IoTProvision_Lambda”
- Setup AWS API Gateway
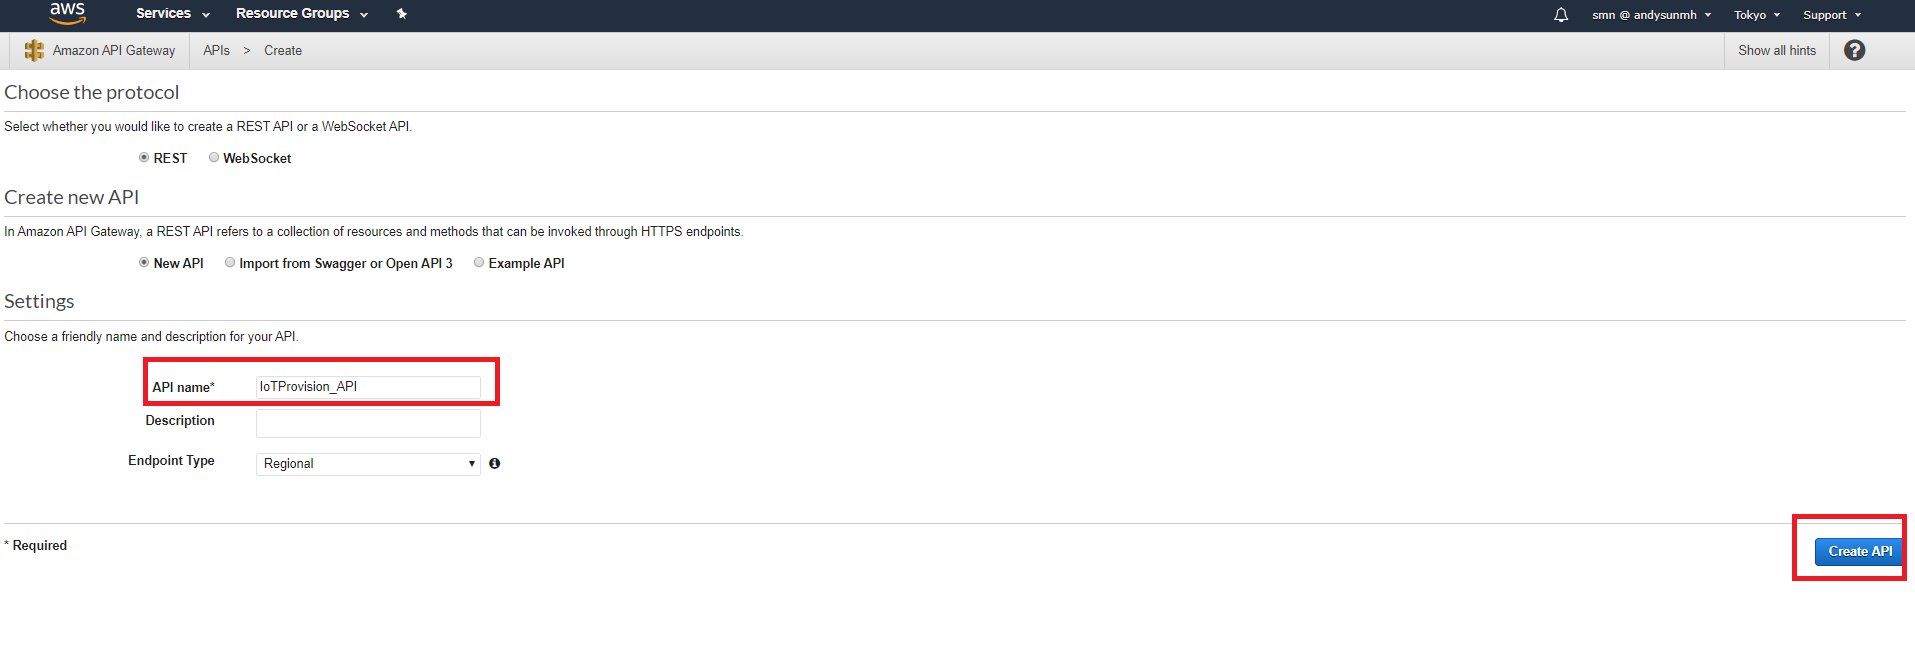
- Create API, and then choose REST API.
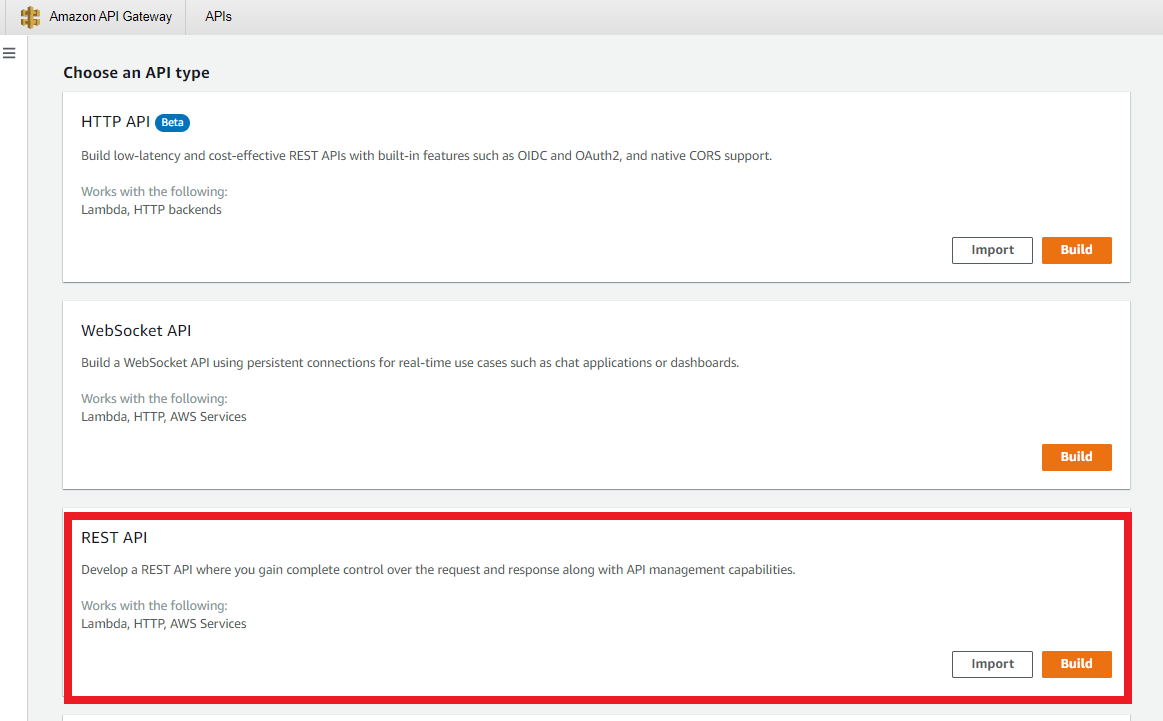
- Choose NewAPI and fill in API name “IoTProvision_API”, then create.
- Now that, we can start configure the following settings with red rectangle, then back to setup Resource method.
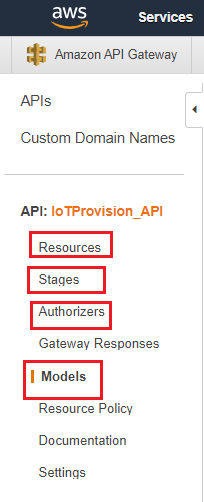
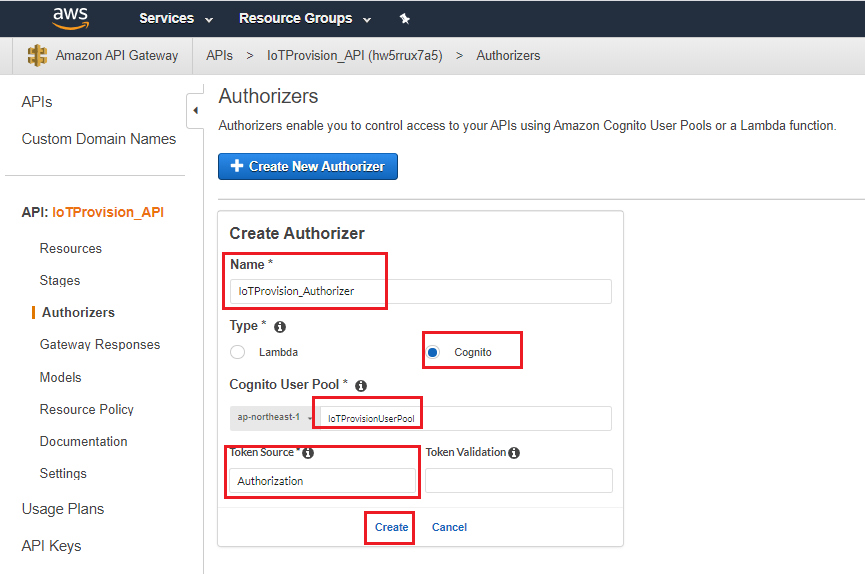
- Authorizers configuration
- Name: “IoTProvision_Authorizer”
- Select Cognito
- Cognito User Pool “IoTProvisionUserPool”
- Token Source “Authorization”
- Create
- Model configuration
- Create method used by API Method.
- Name: “CertReplay“
- Content type: “applicaiton/json”
- Fill in Model schema.
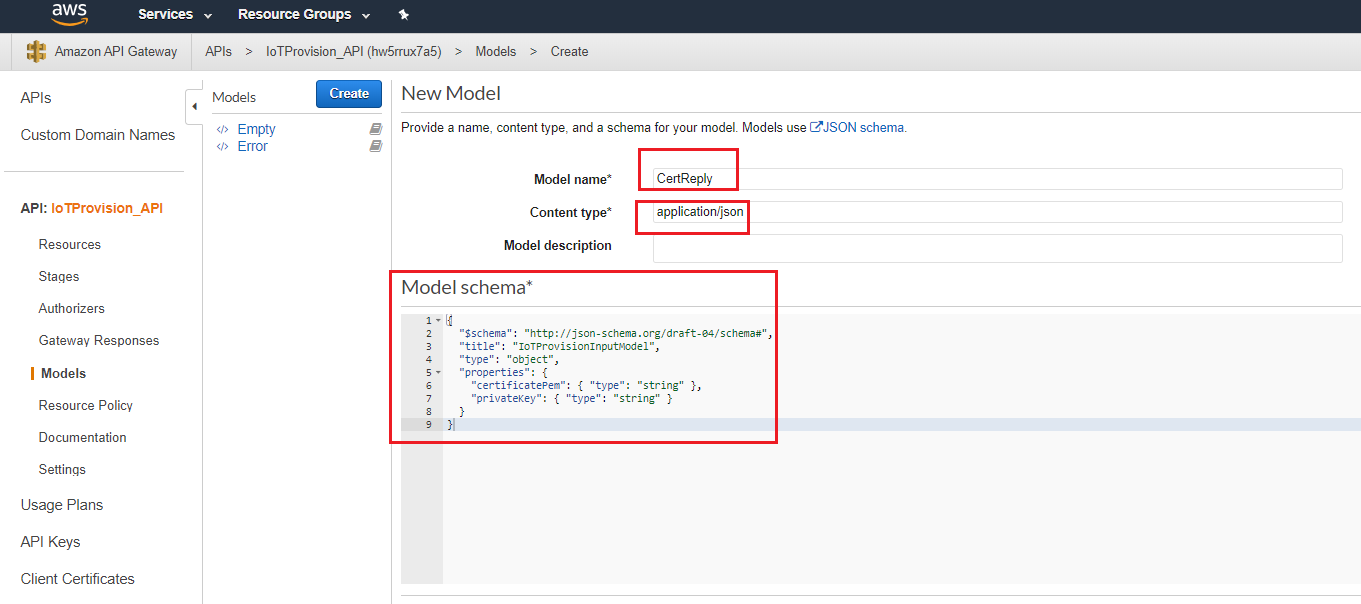
 {
   "$schema": "http://json-schema.org/draft-04/schema#",
   "title": "IoTProvisionInputModel",
   "type": "object",
   "properties": {
     "certificatePem": { "type": "string" },
     "privateKey": { "type": "string" }
   }
 }
- Create method used by API Method.
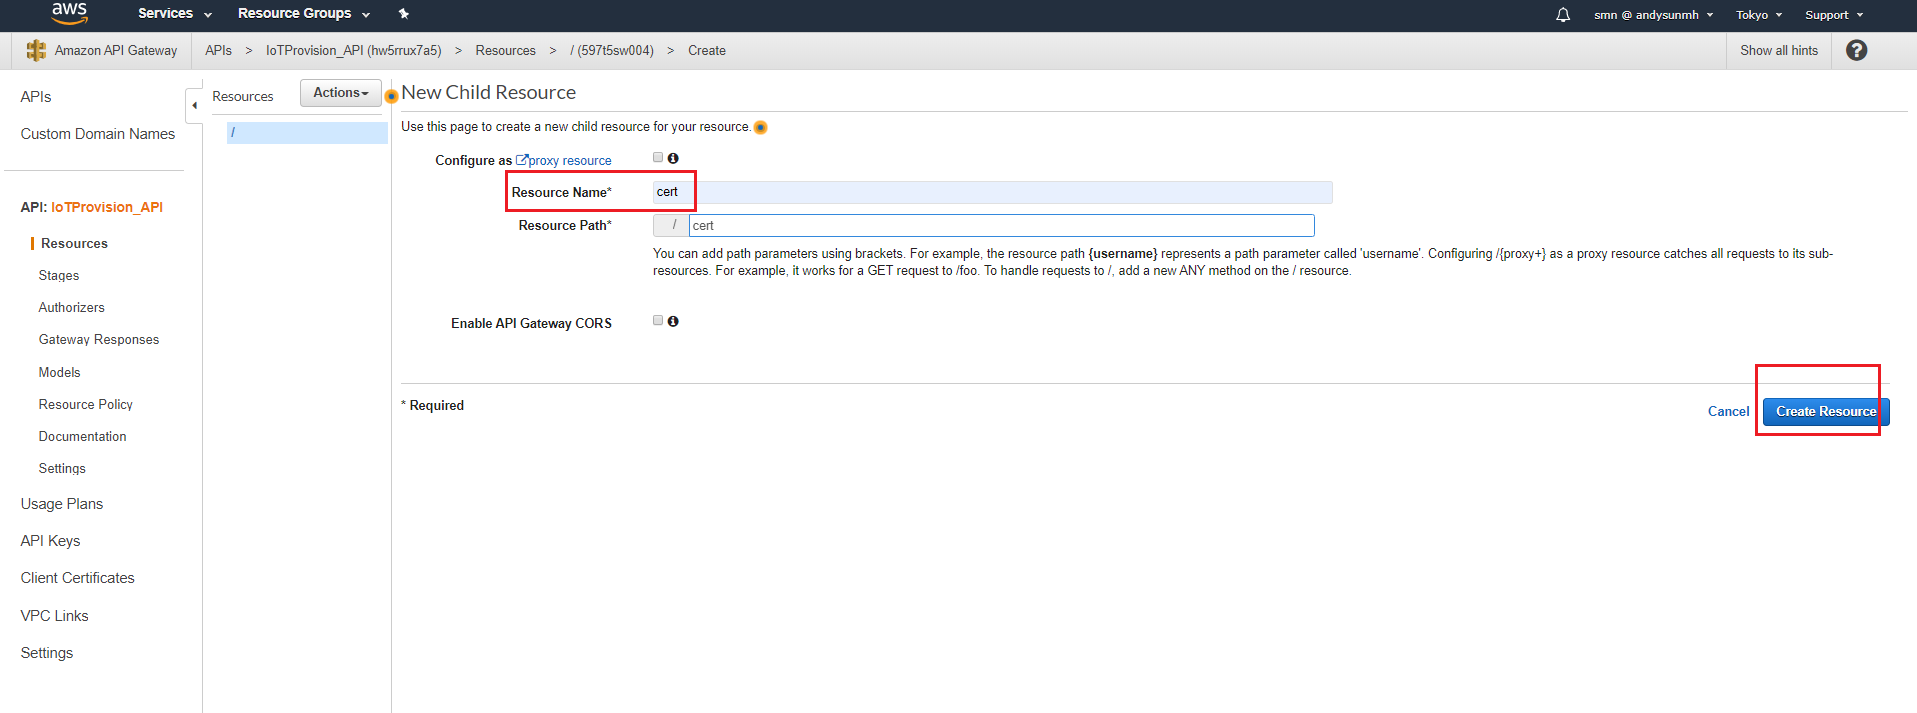
- Resource configuration
- Resource Name “cert”
- Create Resource
- Action → Create Method.
- Select “GET”
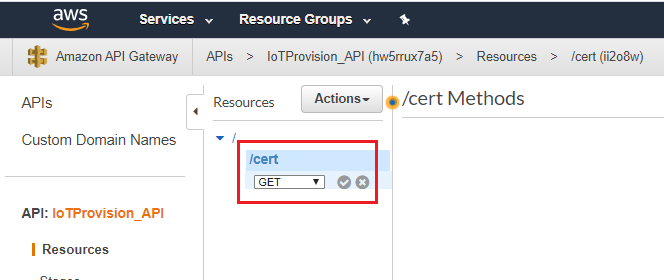
- Select “GET”
- The method setup
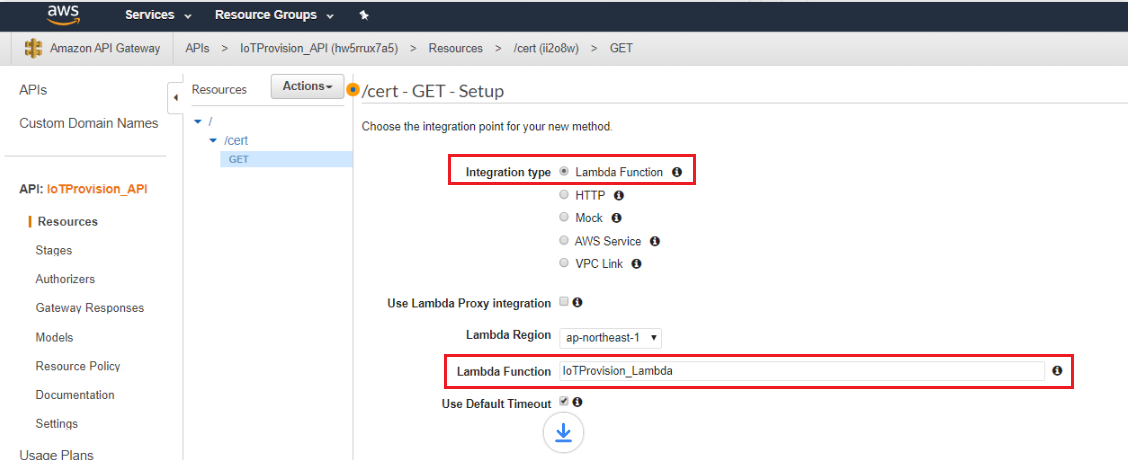
- Integration type → Lambda function.
- Lambda function → IoTProvision_Lambda
- Then save.
- Configure GET - Method Execution
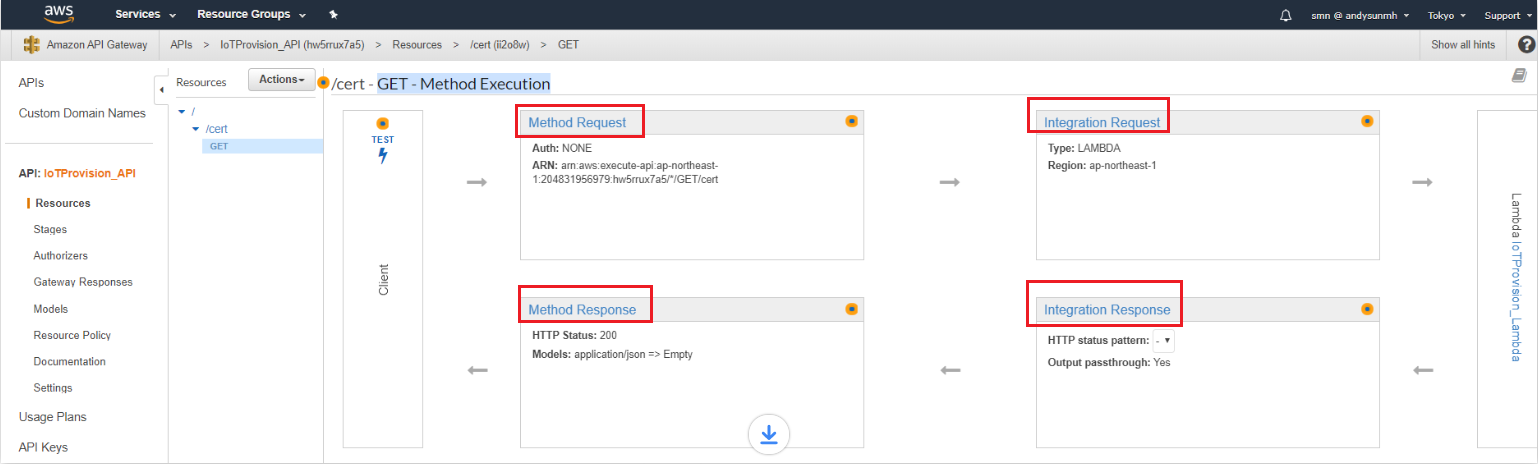
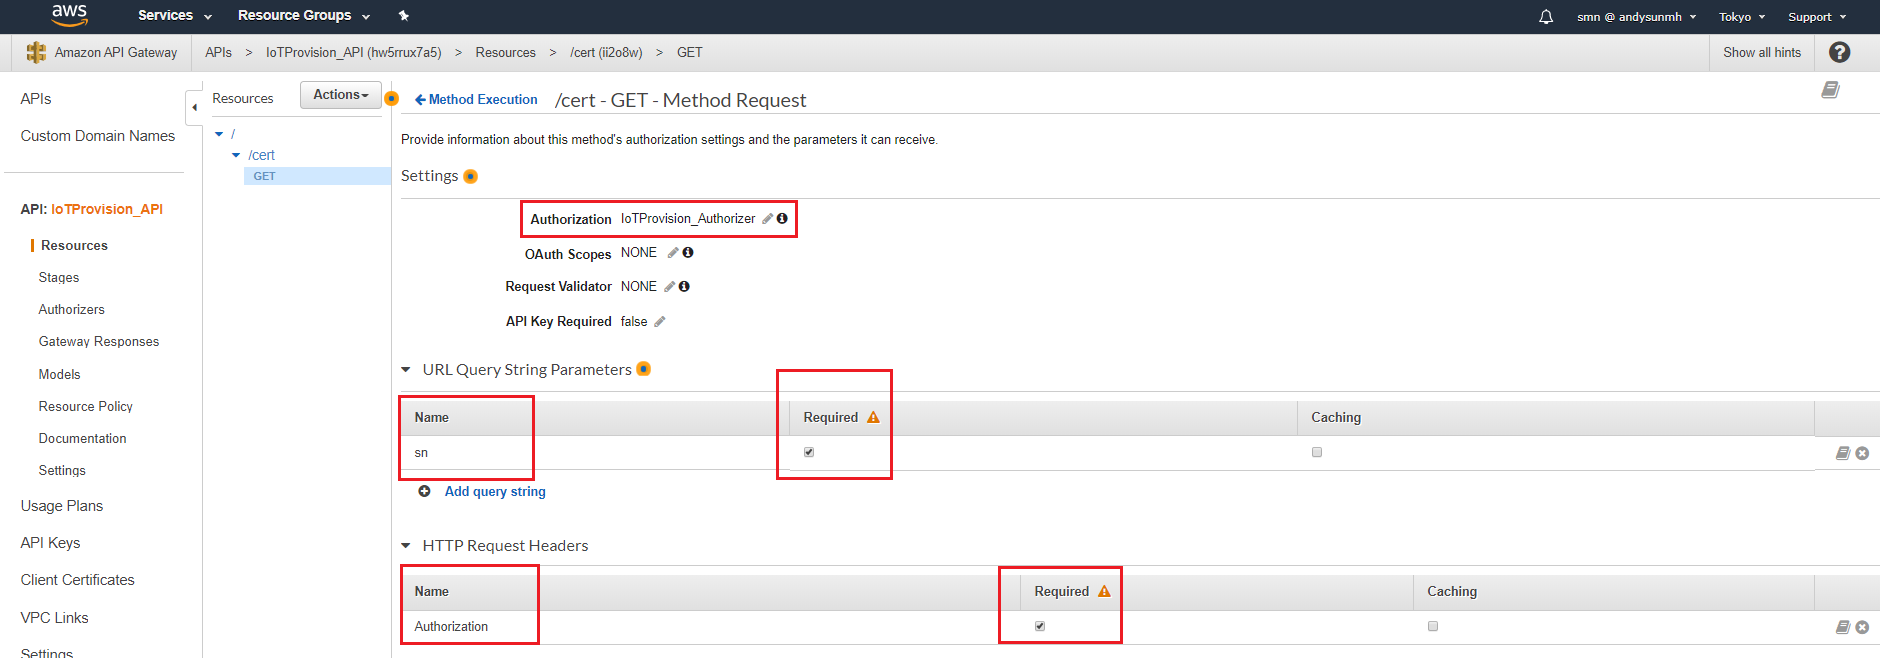
- Configure Method Request:
Authorization:”IoTProvision_Authorizer”
URL QRL String Parameters, Name: “sn”, then check Required.
HTTP Request Headers, Name: “Authorization”, then check Required.
- Configure Integration Request
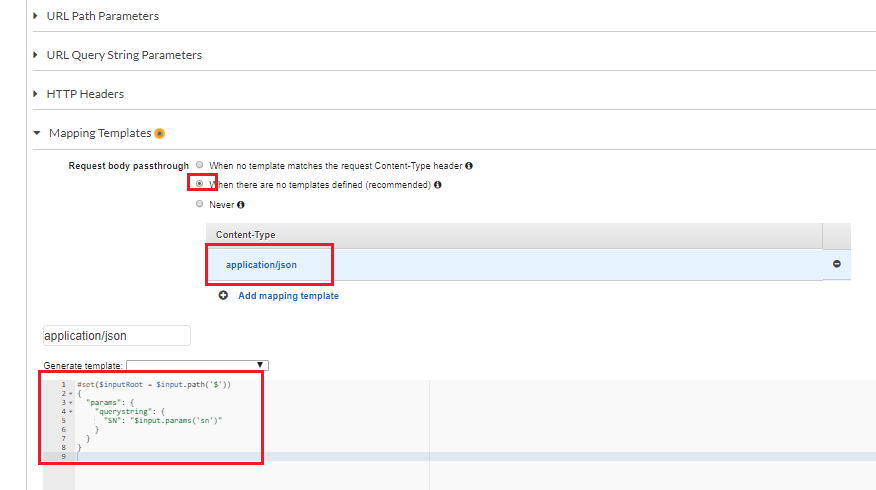
-
application/json
 #set($inputRoot = $input.path('$'))
 {
   "params": {
     "querystring": {
       "SN": "$input.params('sn')"
     }
   }
 }
-
- Configure Integration Response
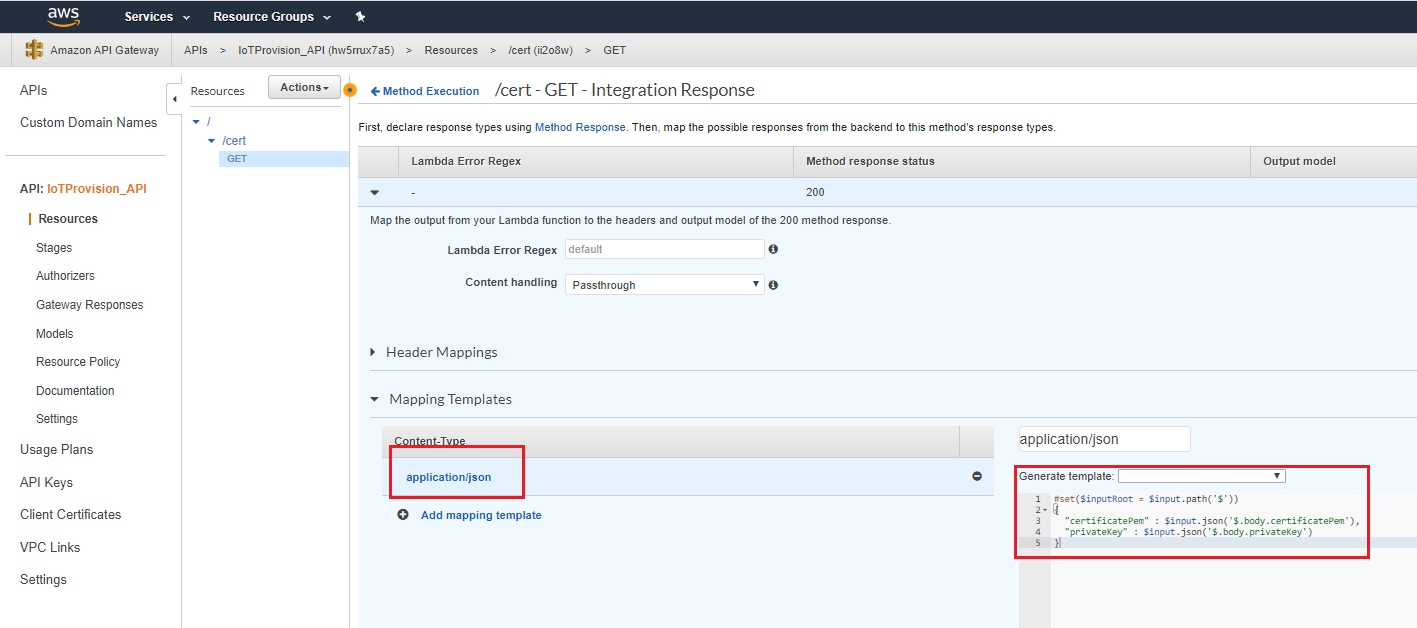
-
application/json
 #set($inputRoot = $input.path('$'))
 {
   "certificatePem" : $input.json('$.body.certificatePem'),
   "privateKey" : $input.json('$.body.privateKey')
 }
-
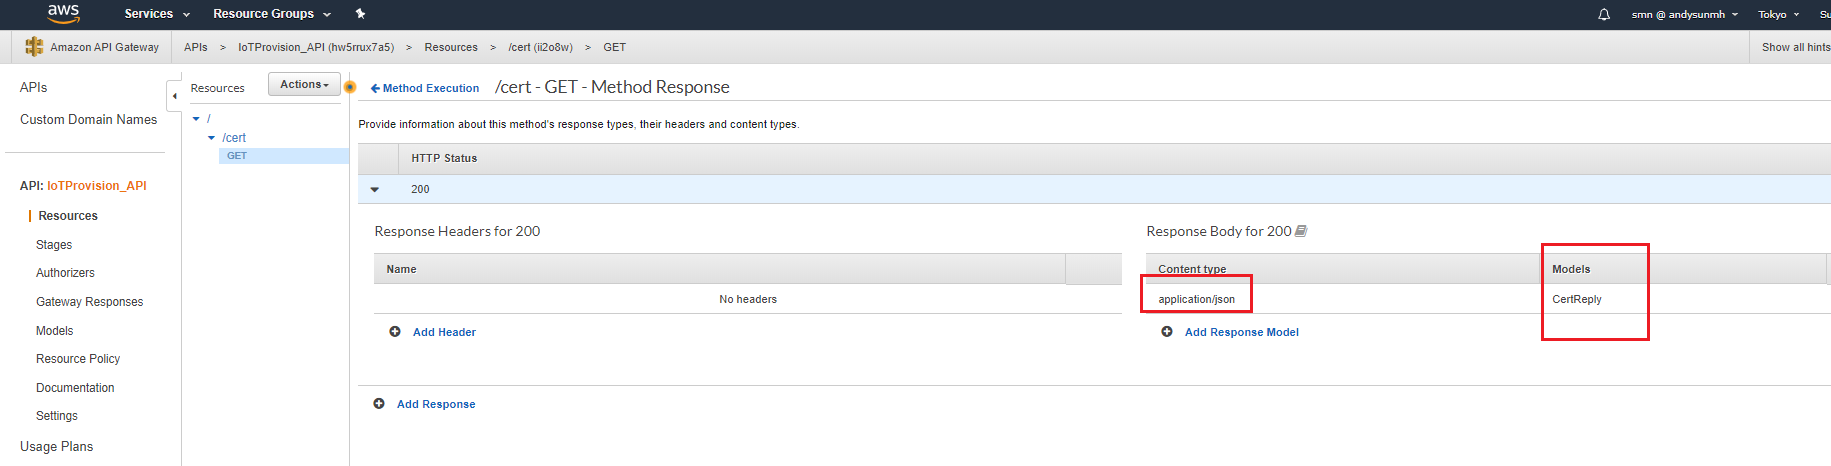
- Configure Method Response
Configure Response Body for 200, Contect type:”application/json”, Models:”CertReply”.
- Configure Method Request:
Authorization:”IoTProvision_Authorizer”
URL QRL String Parameters, Name: “sn”, then check Required.
HTTP Request Headers, Name: “Authorization”, then check Required.
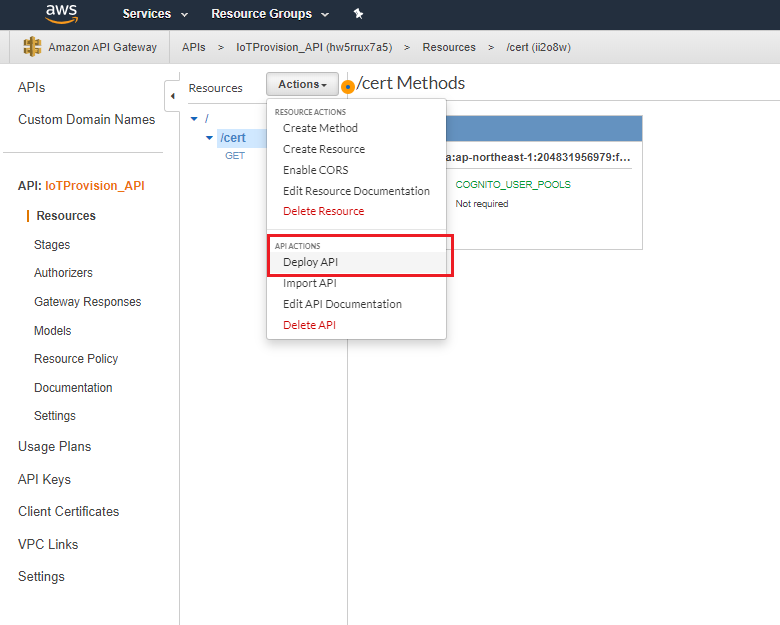
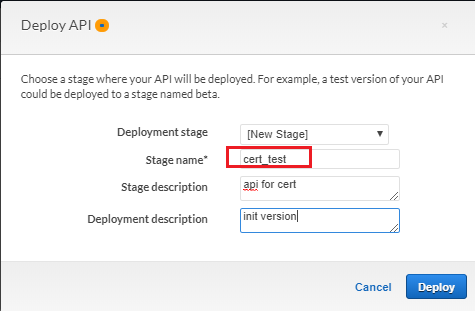
- Deploy API to generate endpoint
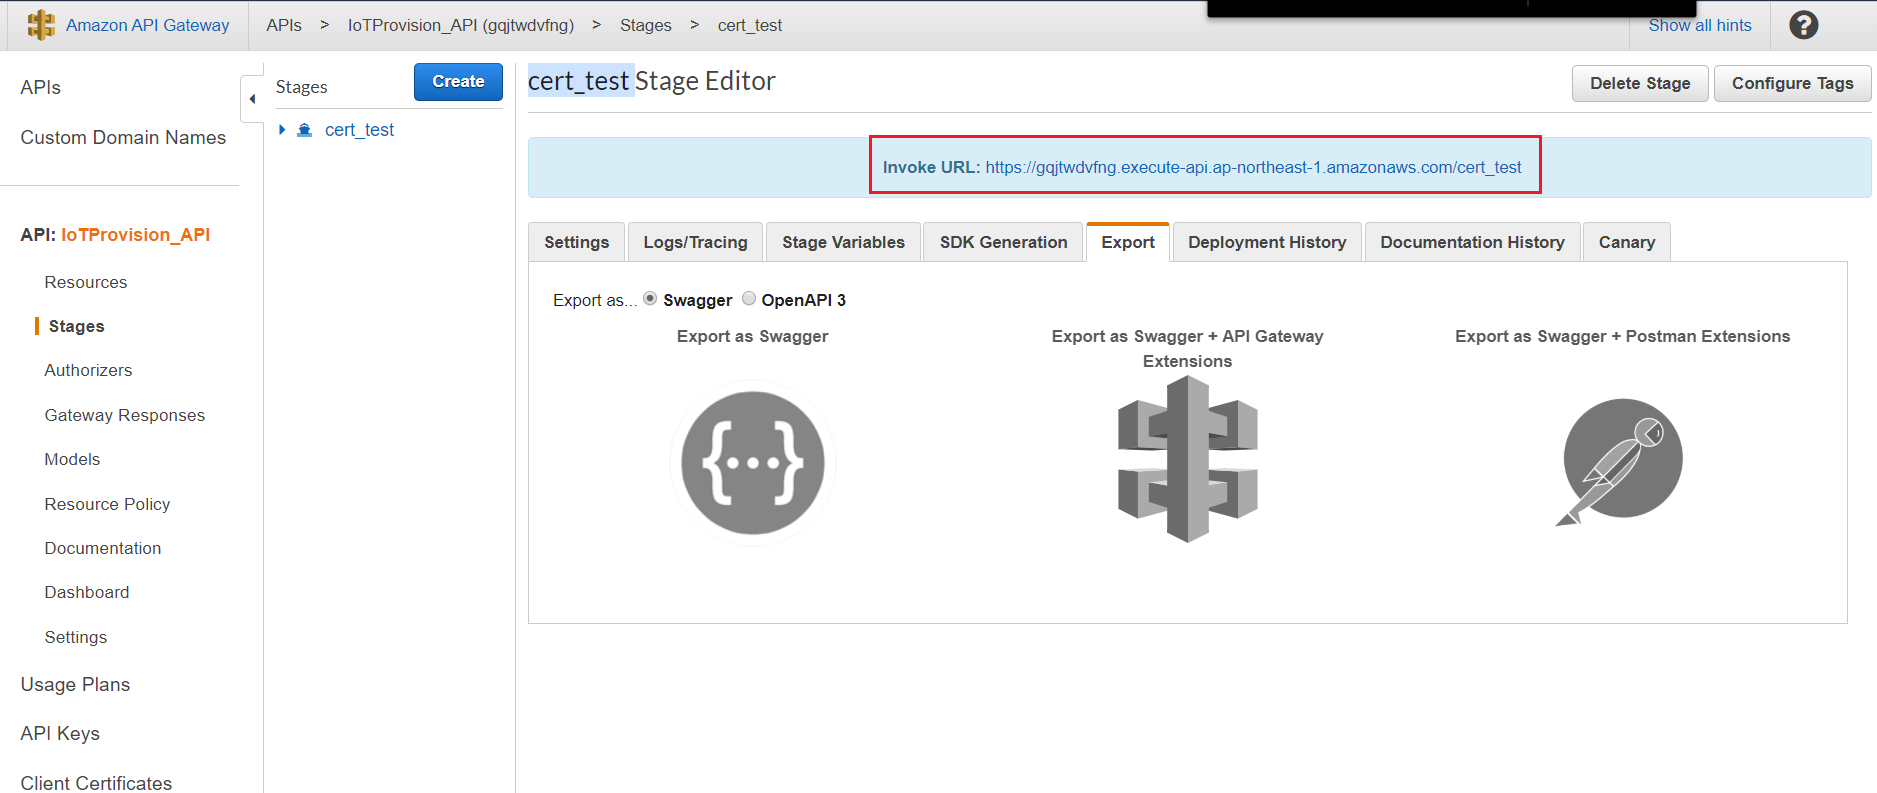
- Check endpoint in Stages
- Create API, and then choose REST API.
- Setup Dynamo DB
- Create Table:
- Table name: DSN
- Primary key: sn
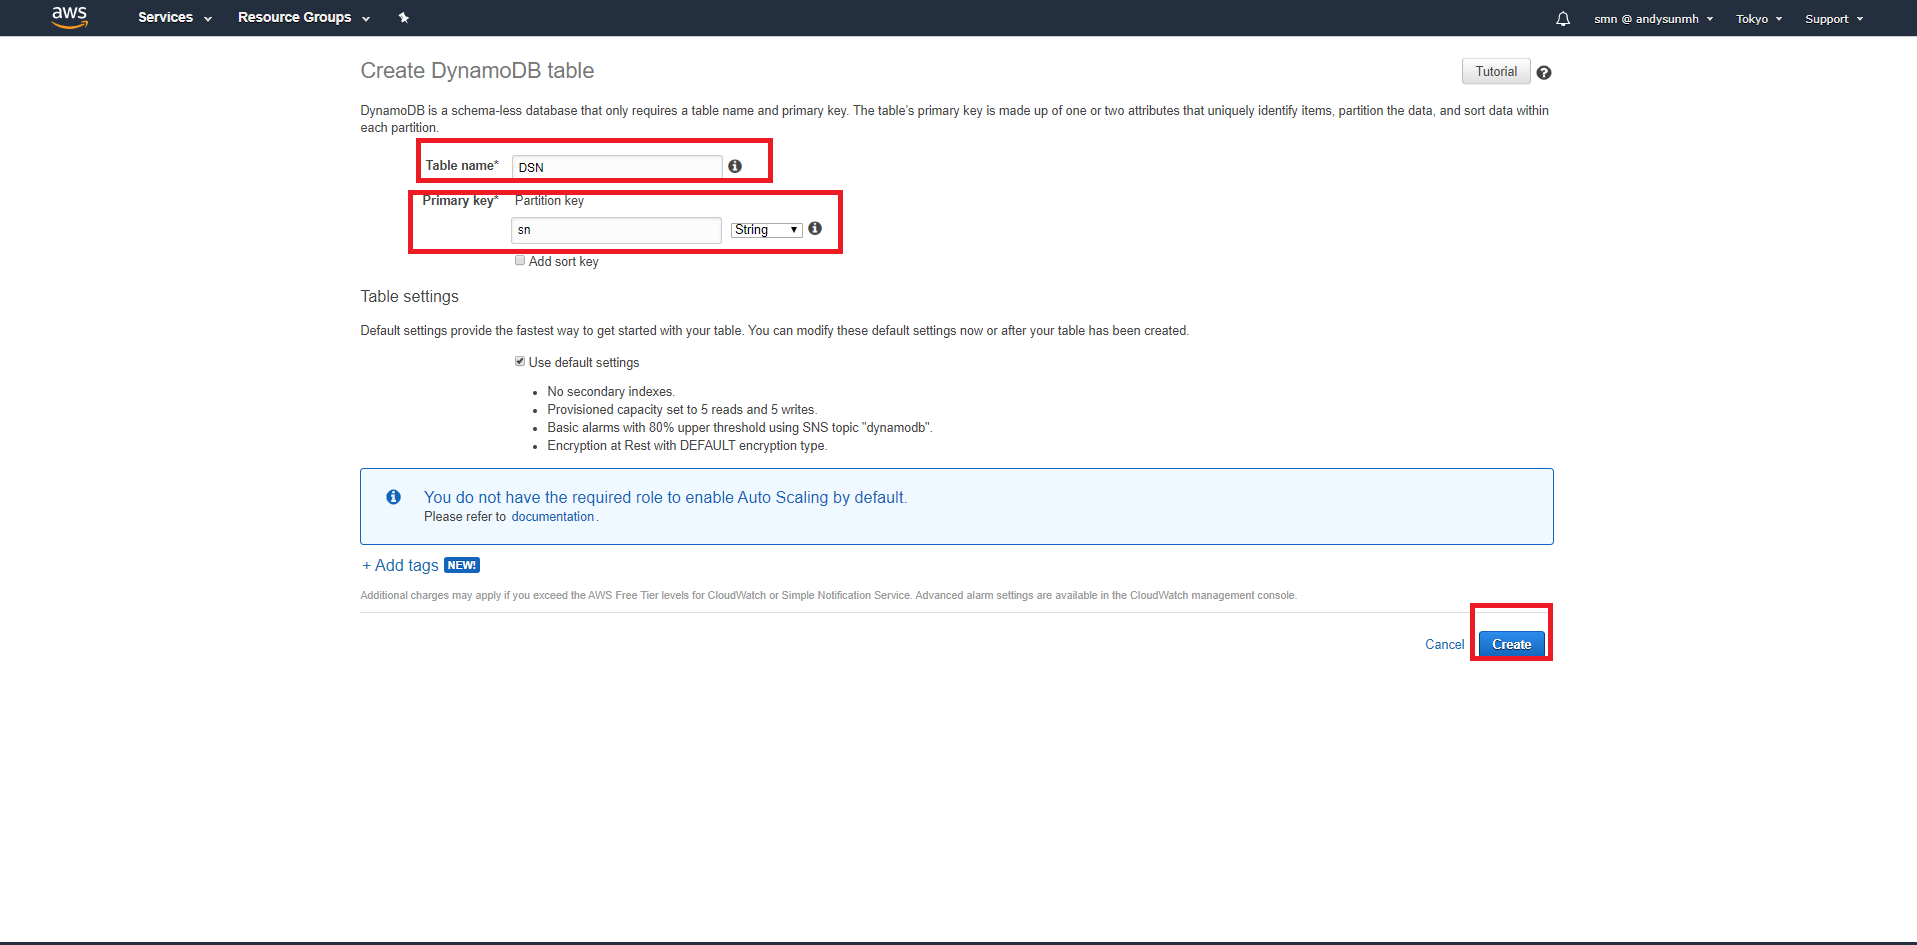
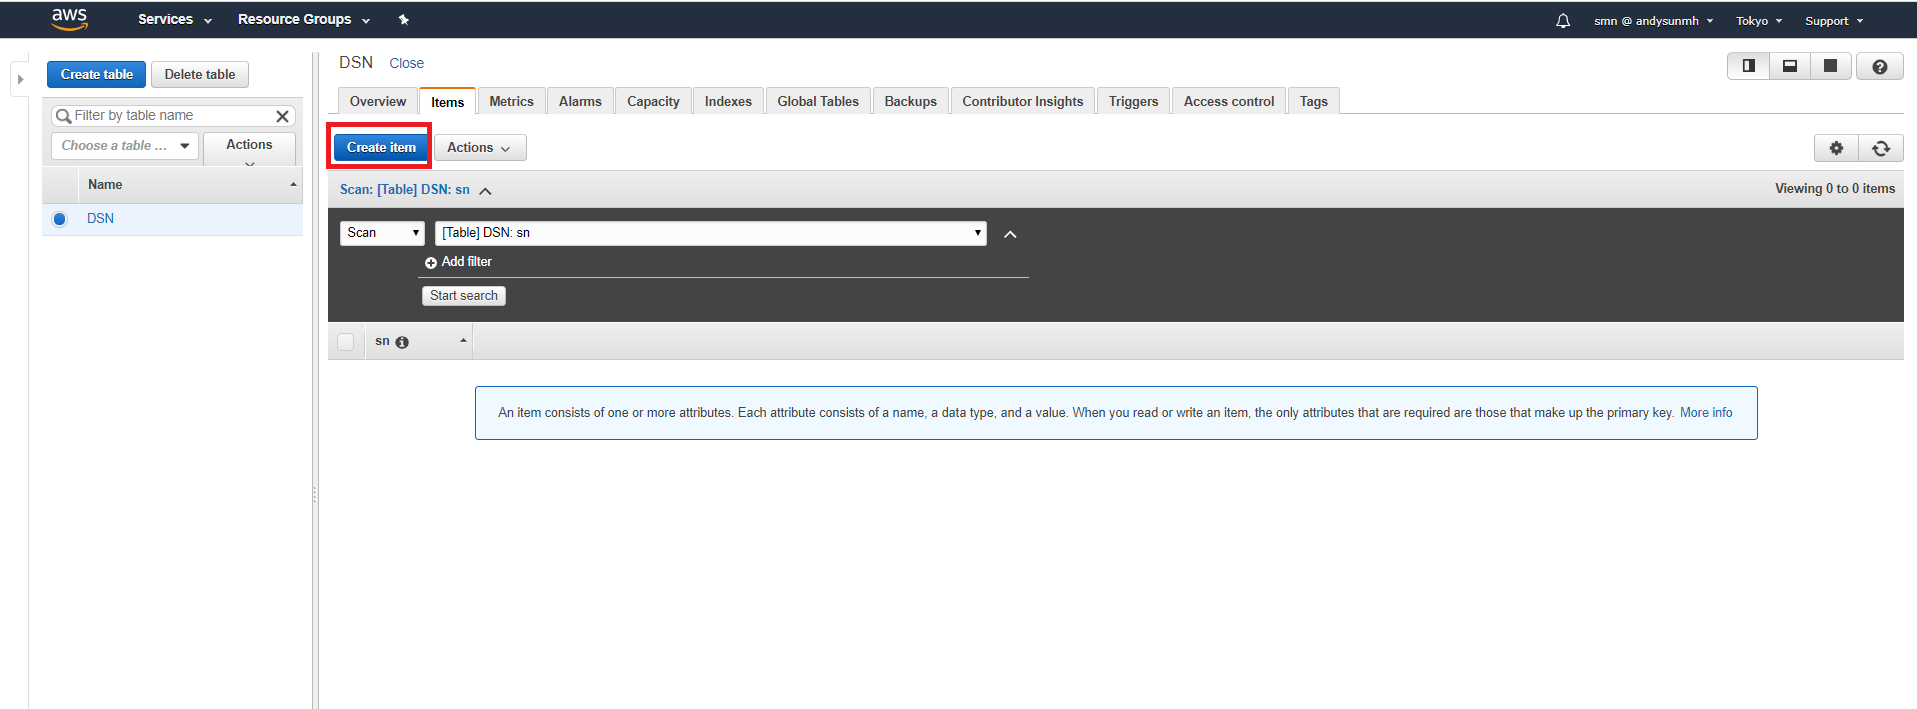
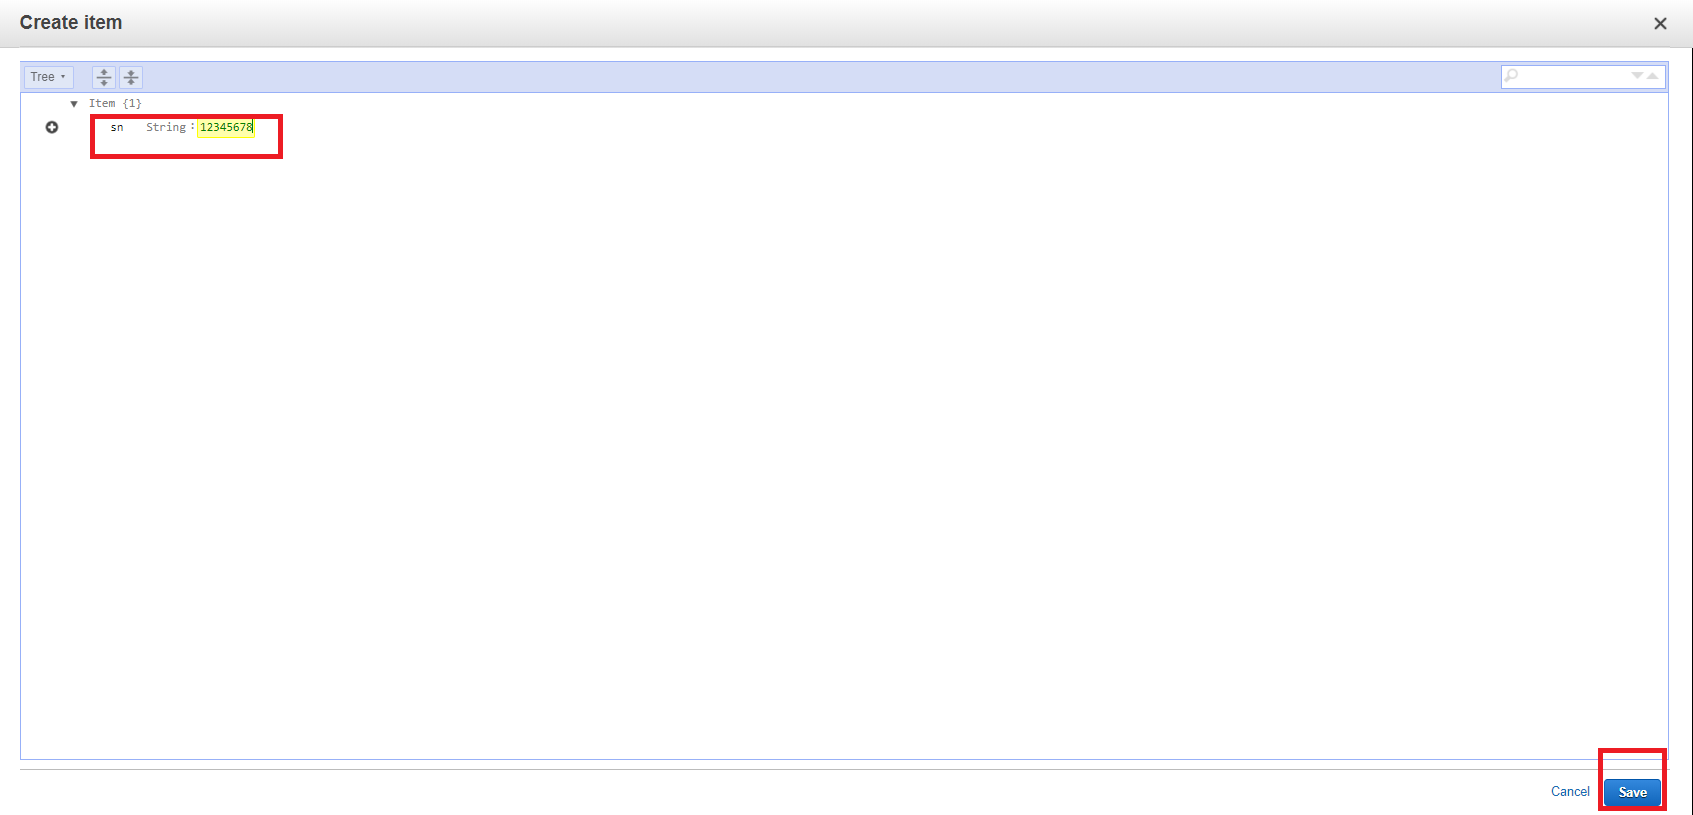
- create your own serial number item, then save it.
- Create Table:
Step 2. - Configure, build, and install the android app
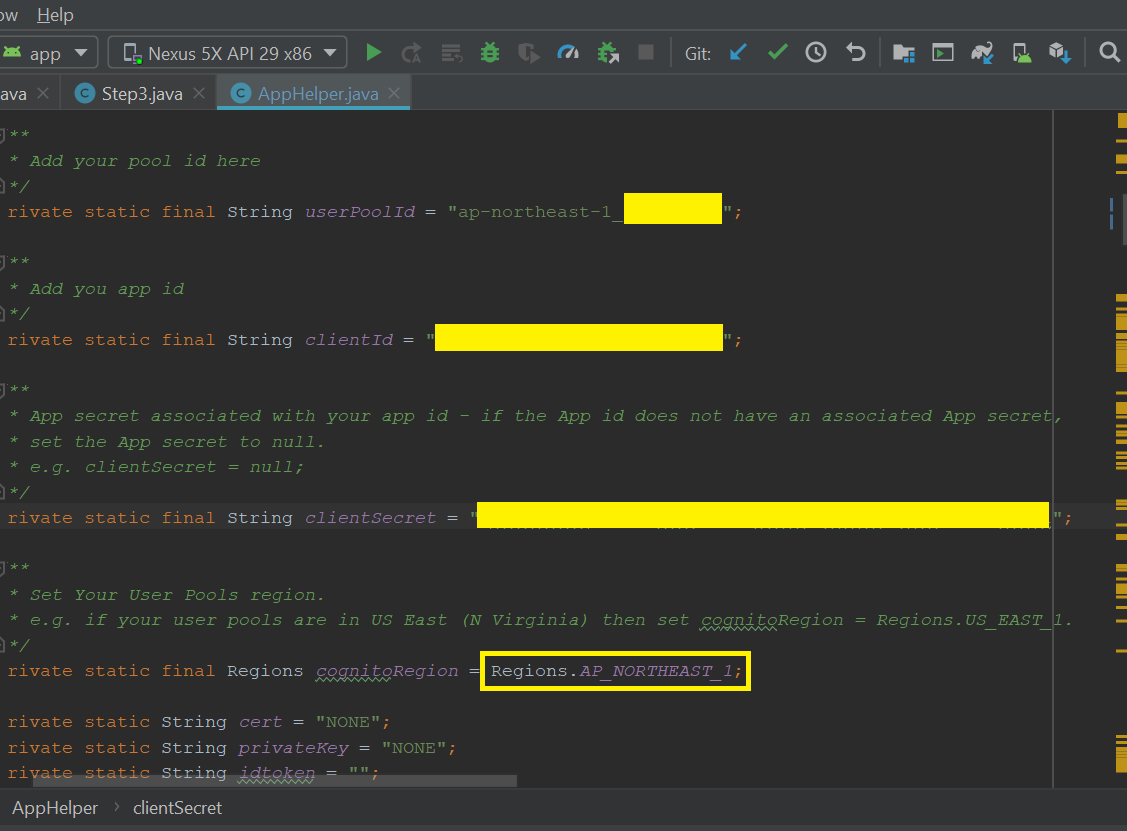
- Fill in app/src/main/java/com/amazonaws/youruserpools/AppHelper.java with the userPoolId, clientId, and clientSecret.
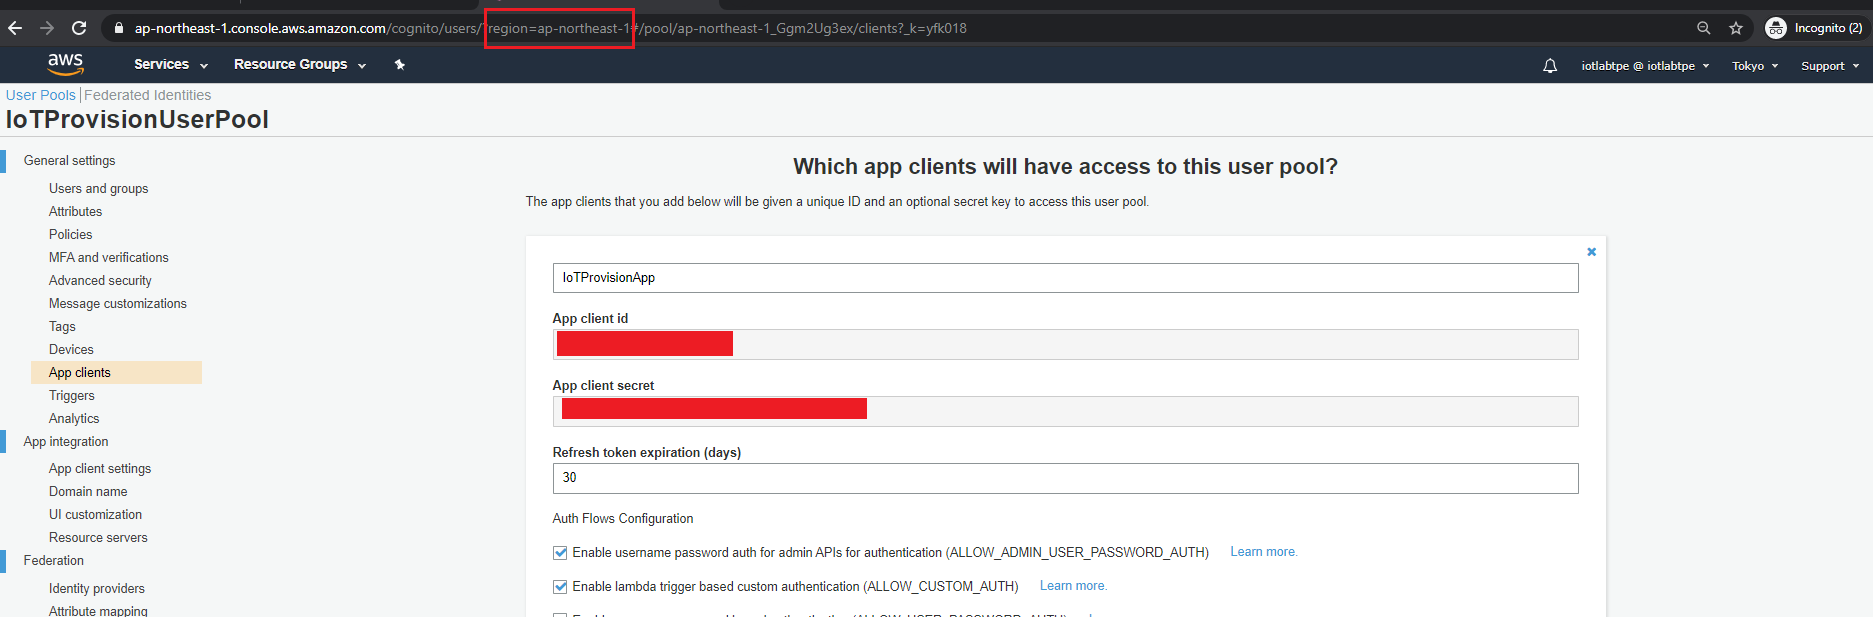
- check these information in your AWS Cognito Service:
Get User Pool ID from Pool ID.
 Get client id and client secret.
- Fill in these information at this location:
- check these information in your AWS Cognito Service:
Get User Pool ID from Pool ID.
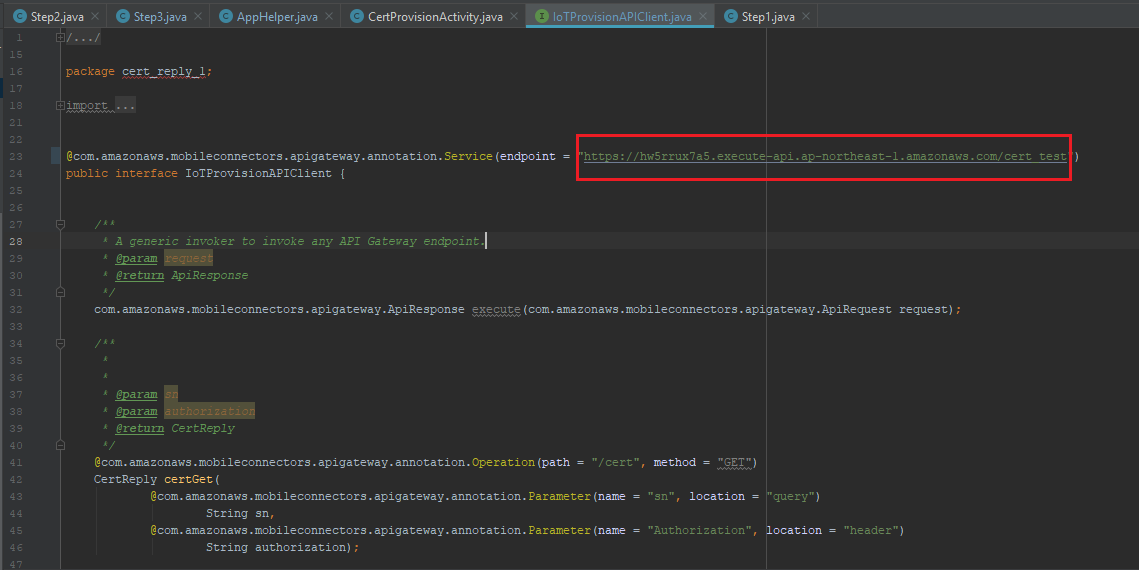
- Fill in your API Gateway endpoint in app\src\main\java\com\amazonaws\youruserpools\IoTProvisionAPIClient.java
- Build and app and install it to the Android Phone, then register your account by AWS Cognito.
Step 3. - Build and Run the Amazon FreeRTOS approach 1 Project
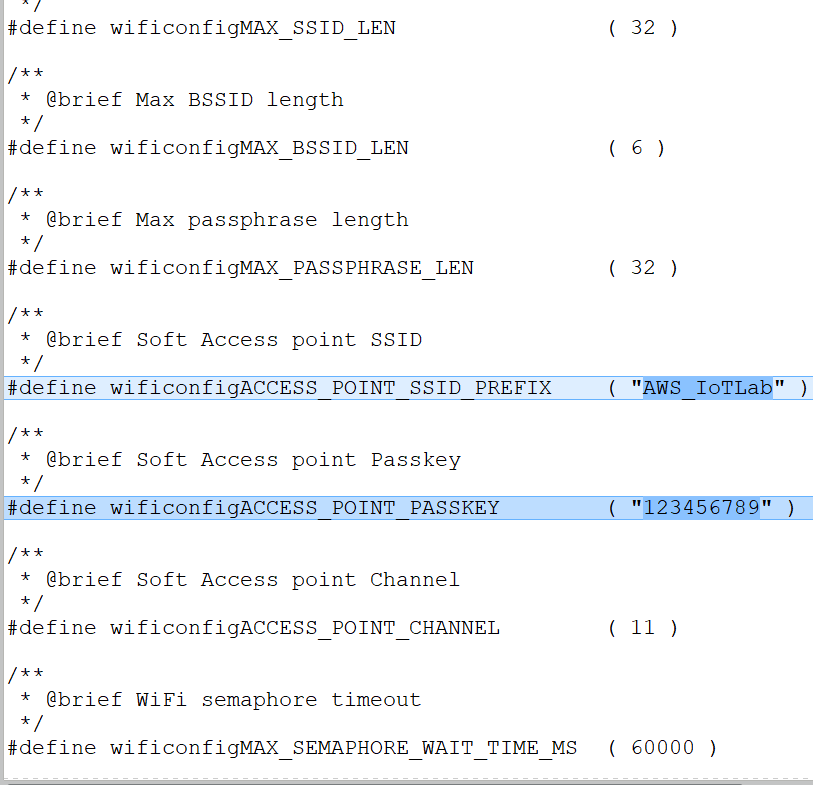
- Fill in Soft AP SSID and password in amazon-freertos\demos\realtek\amebaz2\common\config_files\aws_wifi_config.h
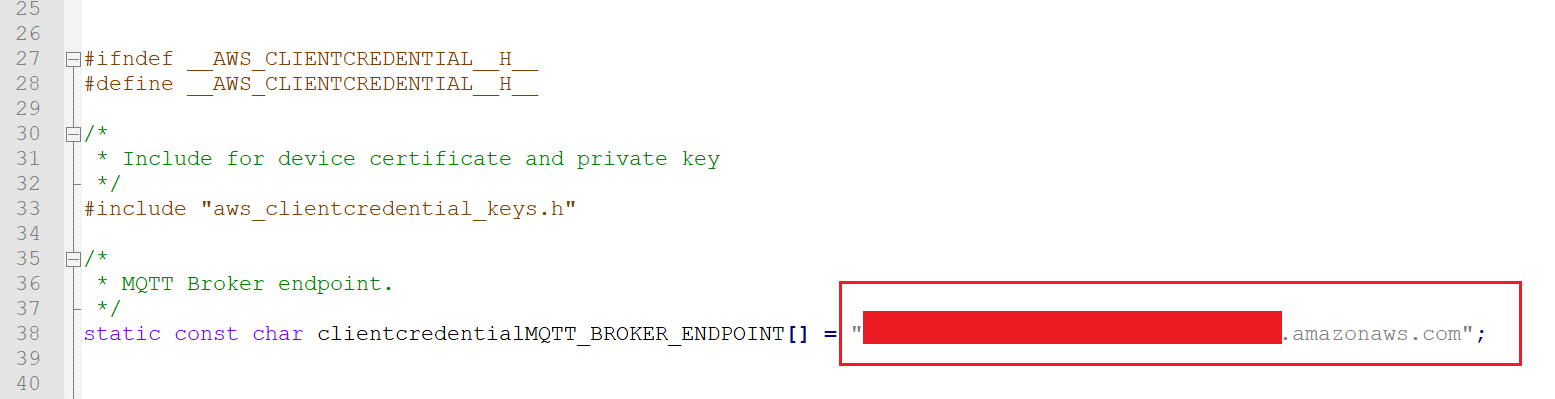
- Fill in your endpoint information in amazon-freertos\demos\common\include\aws_clientcredential.h
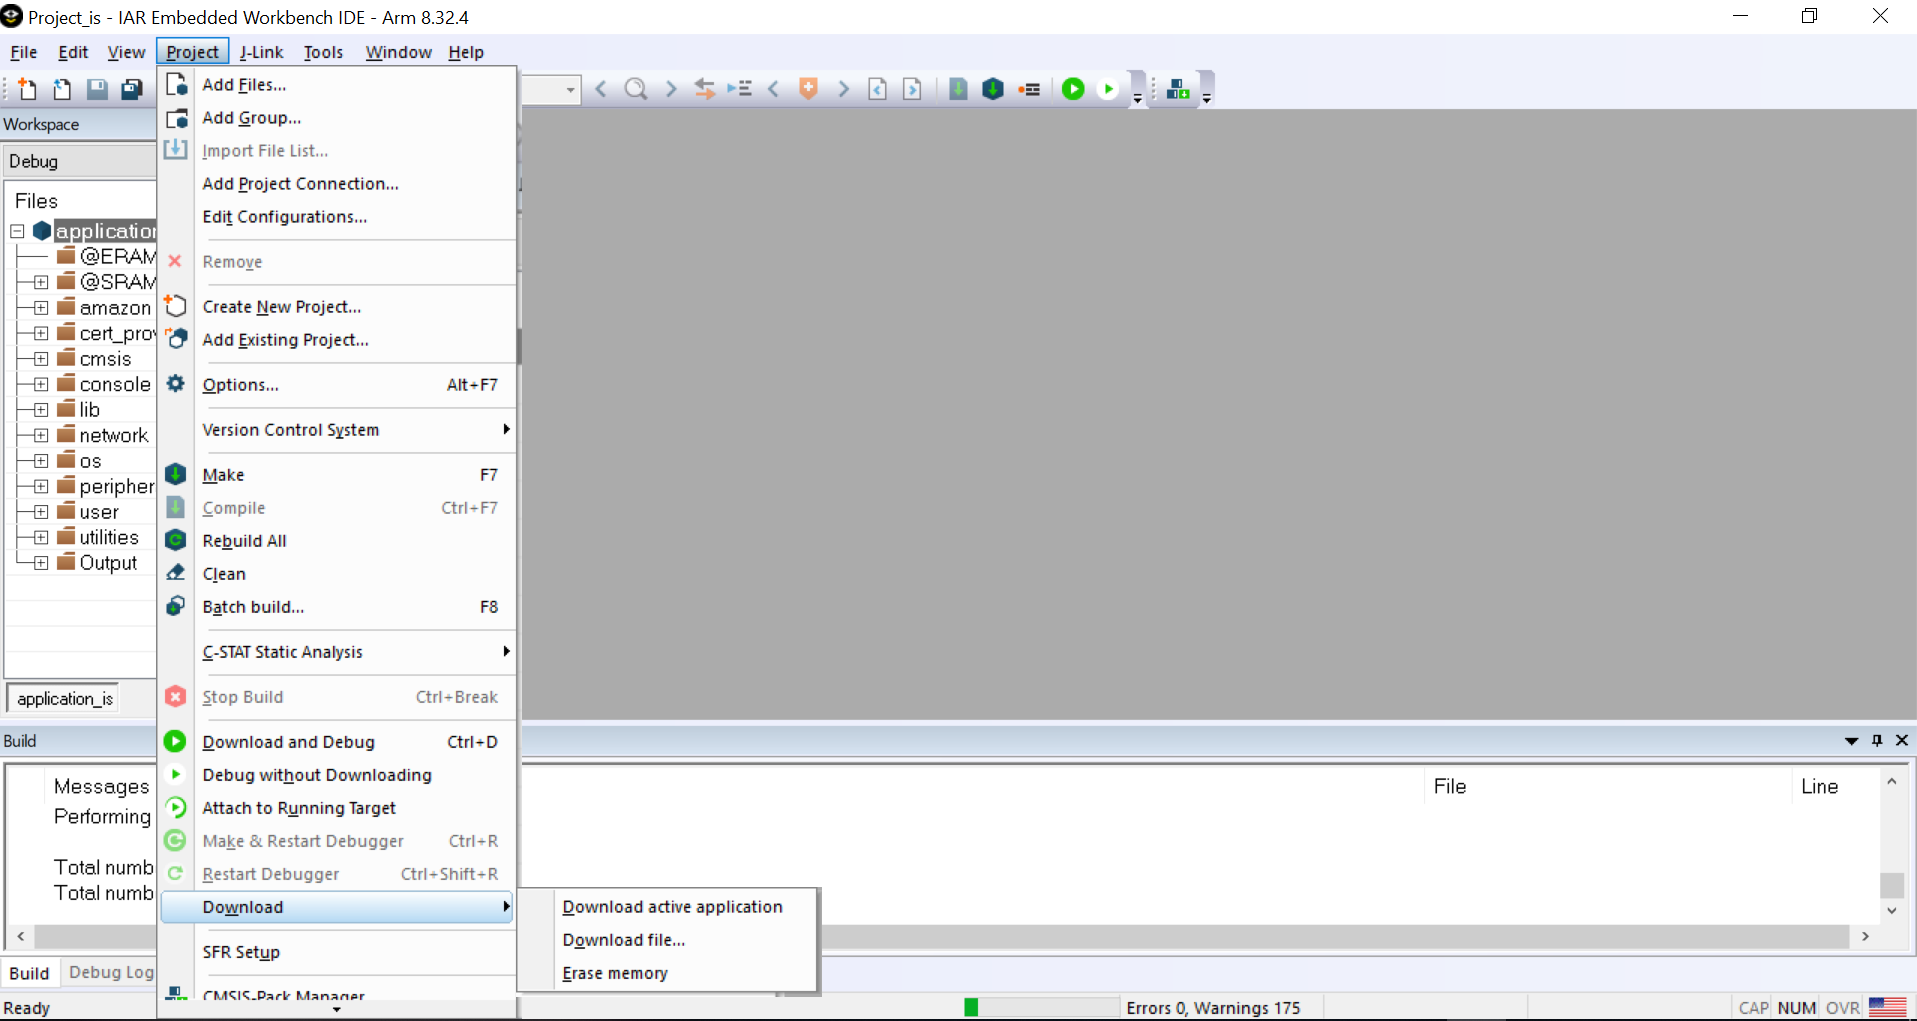
- Build and flash to the device by IAR IDE, then reset the device to let it enter SoftAP mode.
Step 4. - Use the android app to get the user credential from AWS Service
- Sign up your account in the android app.
-
Log in the App.

-
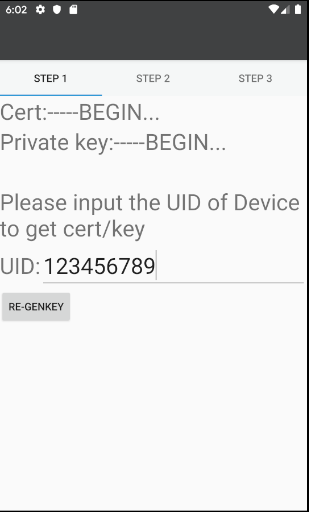
Go to “cert Provision” page and use the UID (Device ID) to get the user credential from AWS Service (push the RE-GENKEY).

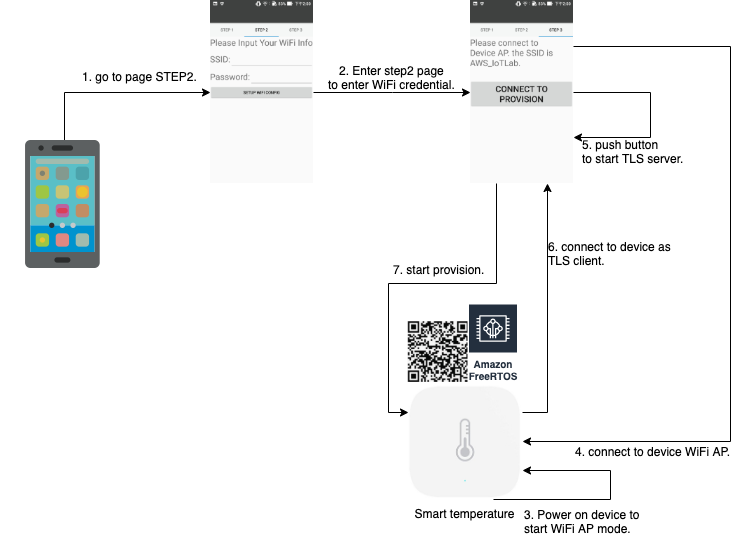
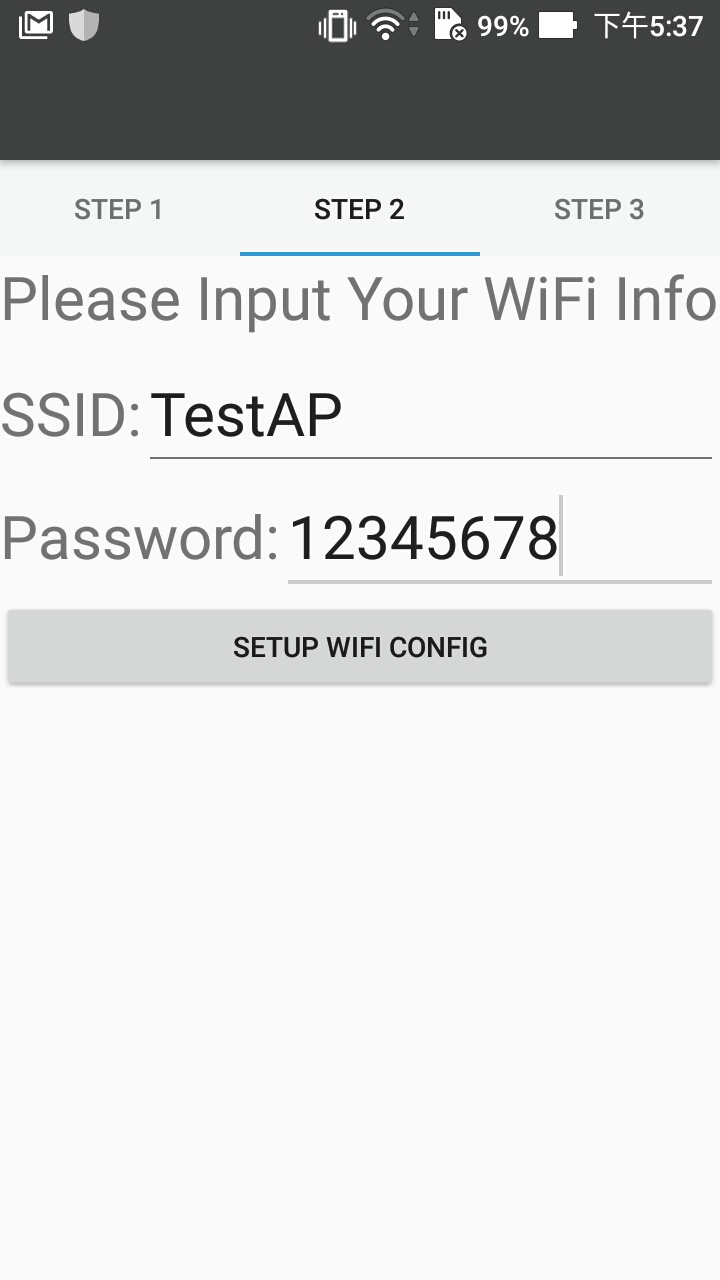
Step 5. - Go to STEP 2 Page to fill in the Wi-Fi credential information which you want the device connect to, then push the “SETUP WIFI CONFIG“
Step 6. - Reset the device to start to the Soft AP mode of the device, then use android app setting to connect to it
Use the following button to reset the device.
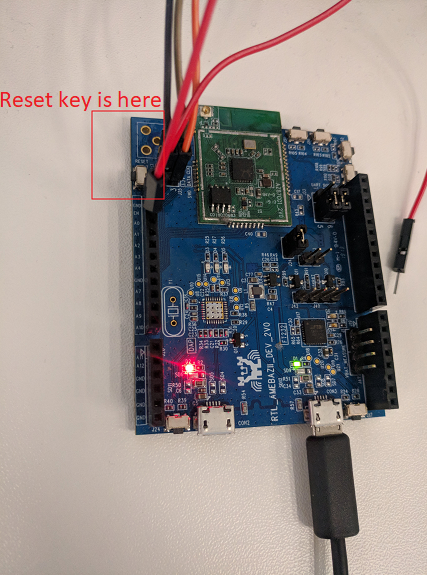 Then it will start Soft AP mode with previous Soft AP setting in Step 3, use android default app to connect to it.

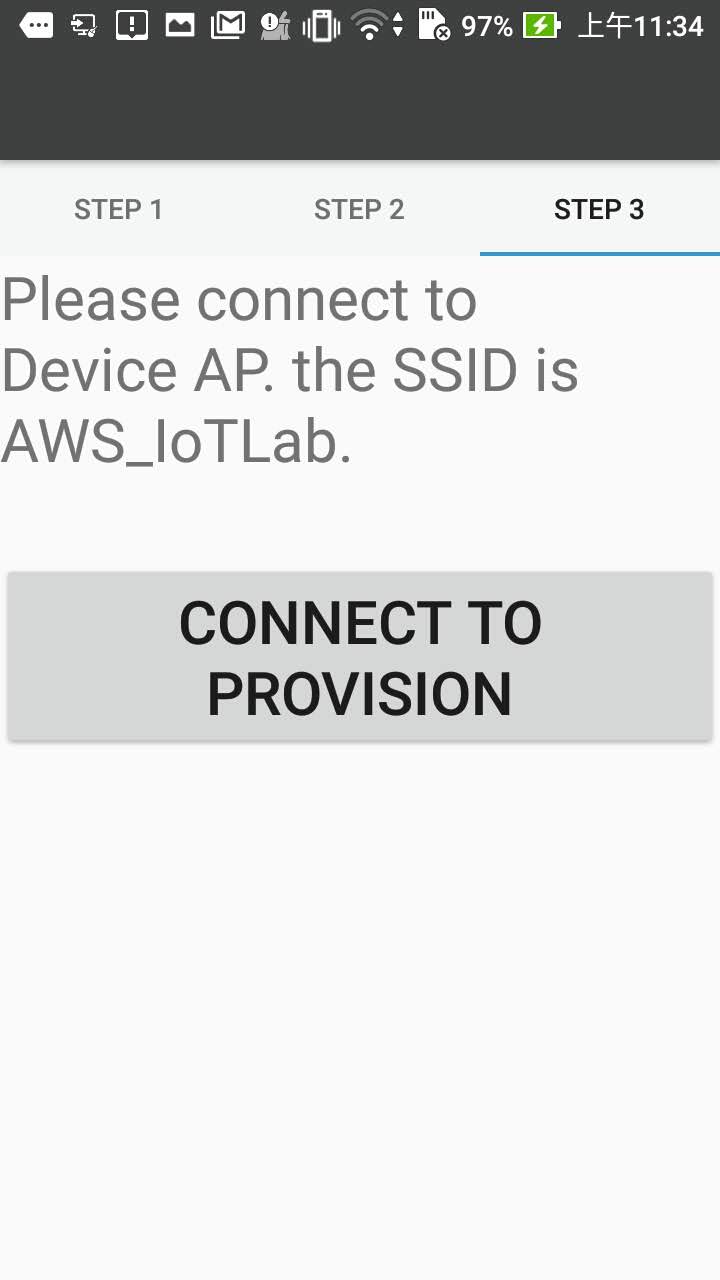
Step 7. - Go to page 3 (app STEP 3 page) to push the button to provision the user credential
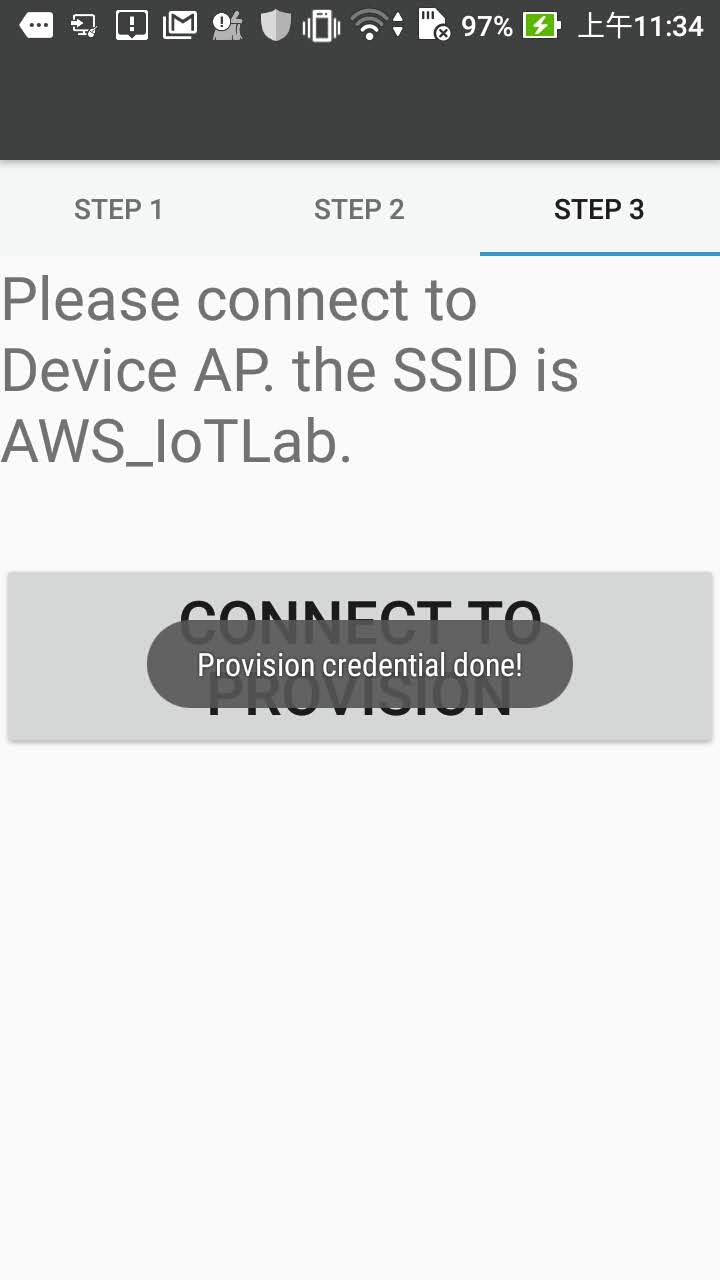
Use the button “CONNECT TO PROVISION” to connect to Soft AP, it will start provisioning once it connect to the Soft AP.
There will be a pop-up a message to show the provision result.
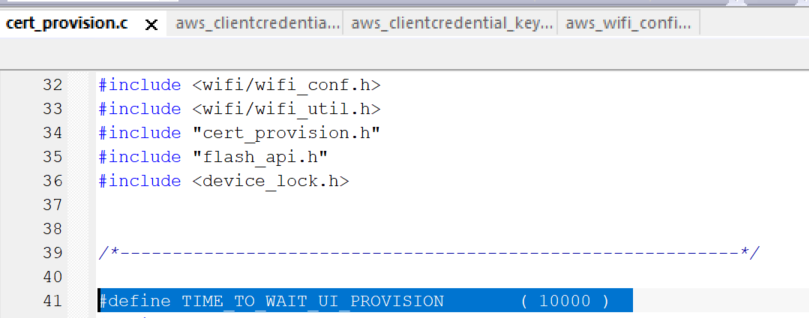
Notice: There is a timeout in device soft AP started after android app connecting to it. If time’s up with no provision, then you need to push the reset button to restart the soft AP process. You can configure this timeout here:
Step 8. - Check the user credential work or not. (By AWS IoT Core Test)
Resetting the device to let it connect to designated WiFi SSID and send publish message to IoT Core. You can check MQTT log in AWS IoT Core.
